Test-Toolkit Tutorial
- Comment puis-je me connecter?
-
Comment puis-je modifier mes données personnelles?
1
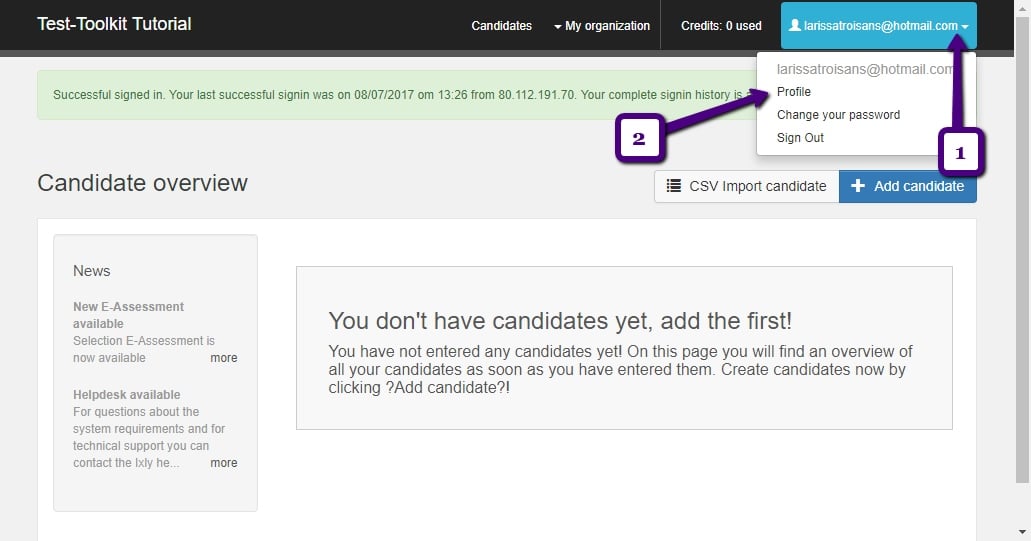
Click the arrow to the right of your email address. A drop-down menu will appear.
 2
2Click ‘profile’.
 3
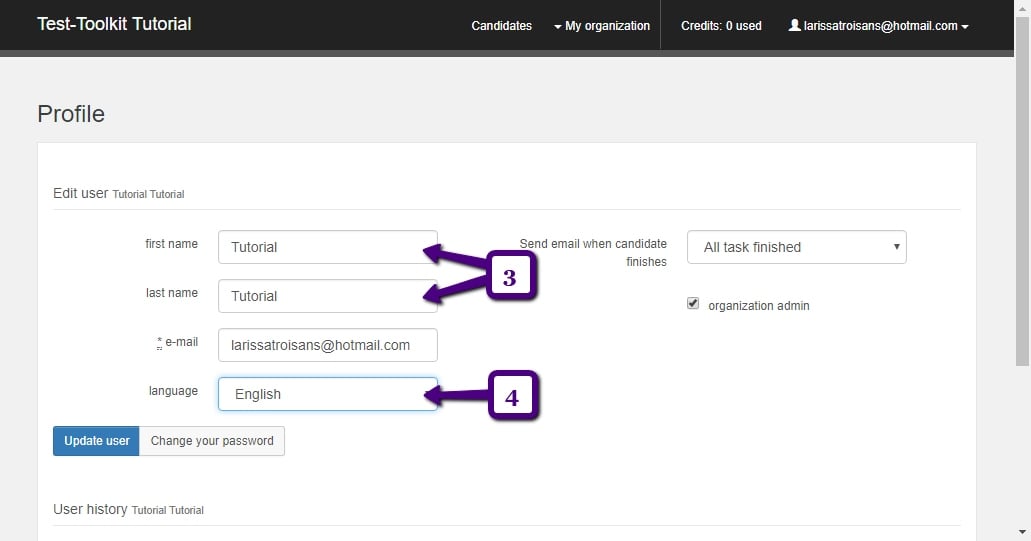
3You will now be taken to your profile page, where you will be able to edit things such as your name.
4If you want to edit your language preference, click the arrow next to ‘Dutch’ to select a different language.
-
Comment puis-je ajouter un candidat?
1
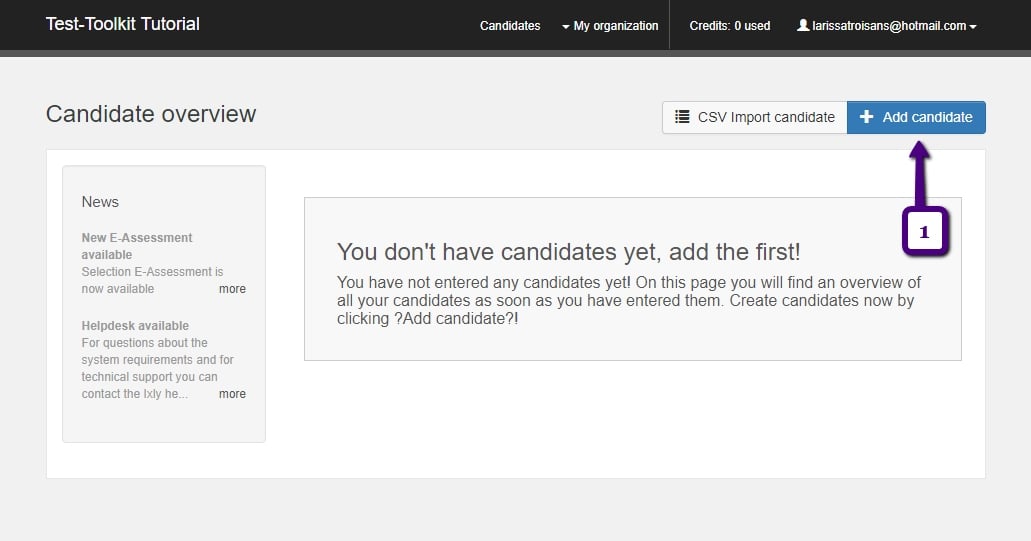
Click ‘Add candidates’ to add a new candidate.
 2
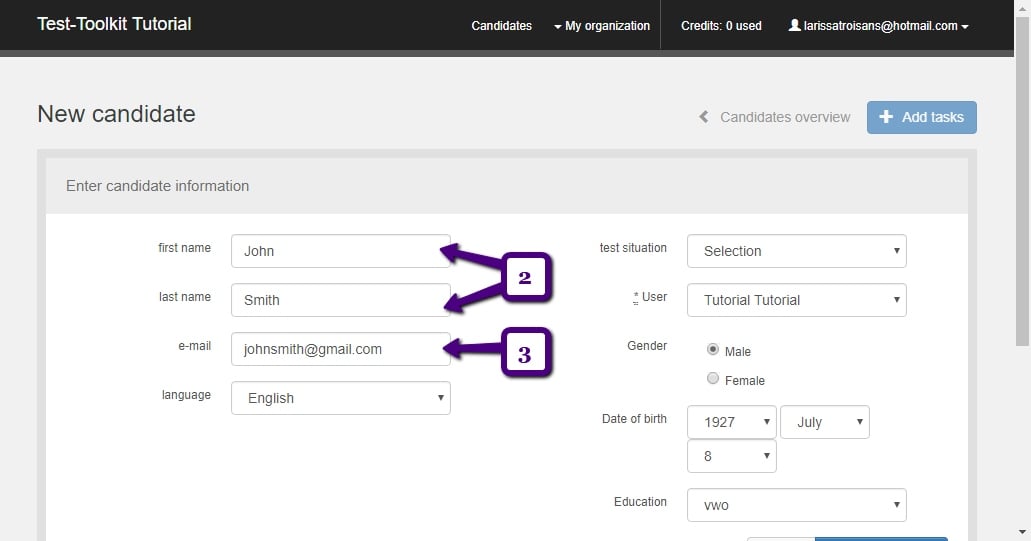
2You will be taken to the following screen. Next, enter the new candidate’s first and last name.
 3
3Enter the email address to which you want the candidate’s invite to be sent.
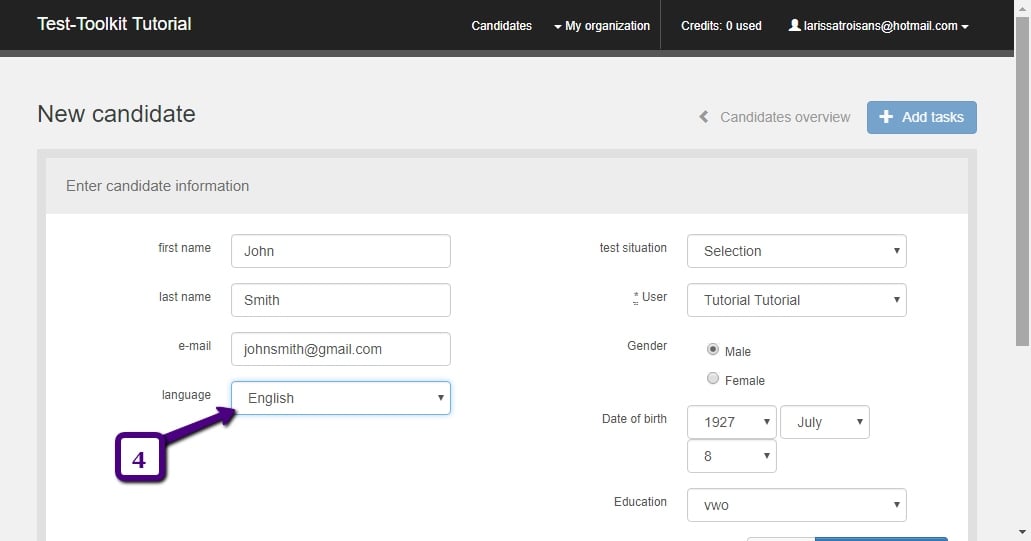
4You can also select the language that the page the candidate will be directed to will be shown in. To do so, click the arrow next to ‘Dutch’ and select your preferred language in the drop-down menu.
 5
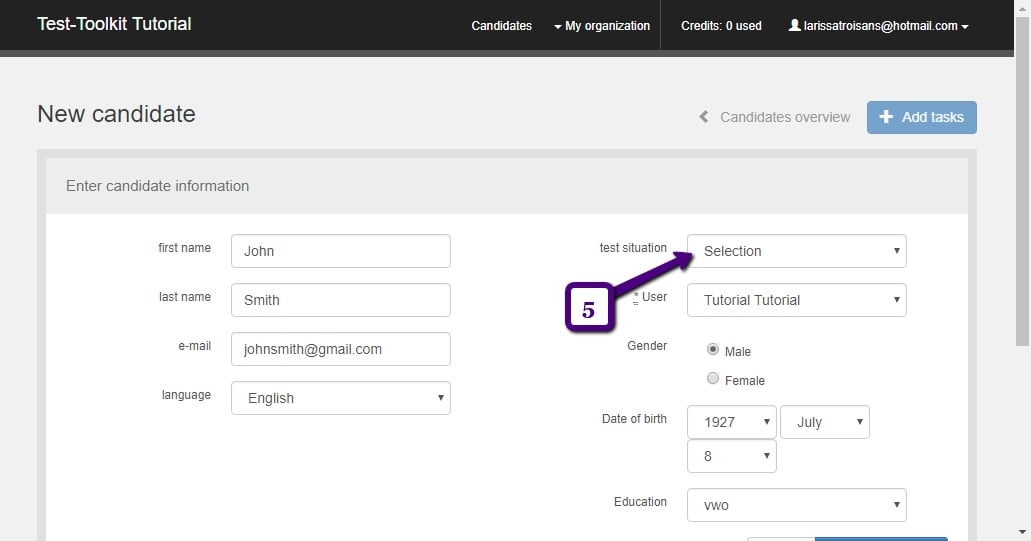
5Next, indicate whether the candidate is coming in for an assessment for selection or advisory purposes, by clicking the arrow next to ‘Selection’.
 6
6(6) Under 'User', you can specify which adviser will assess the new candidate. The adviser must already have a Test-Toolkit account.
(7) Specify the candidate’s gender.
(8) Enter the candidate’s date of birth.
(9) Enter the candidate’s education level.
(10) Click ‘Create candidate’.
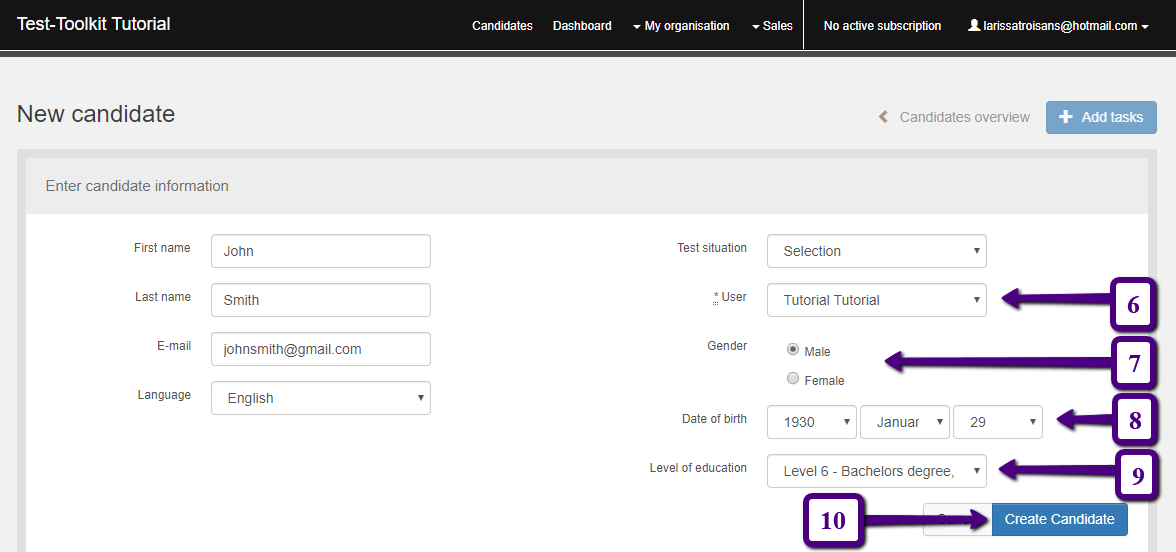
It is important for you to enter all of the information about the candidate, because we use that information to determine the standards for our surveys.
-
Comment puis-je ajouter des tâches à un candidat?
1
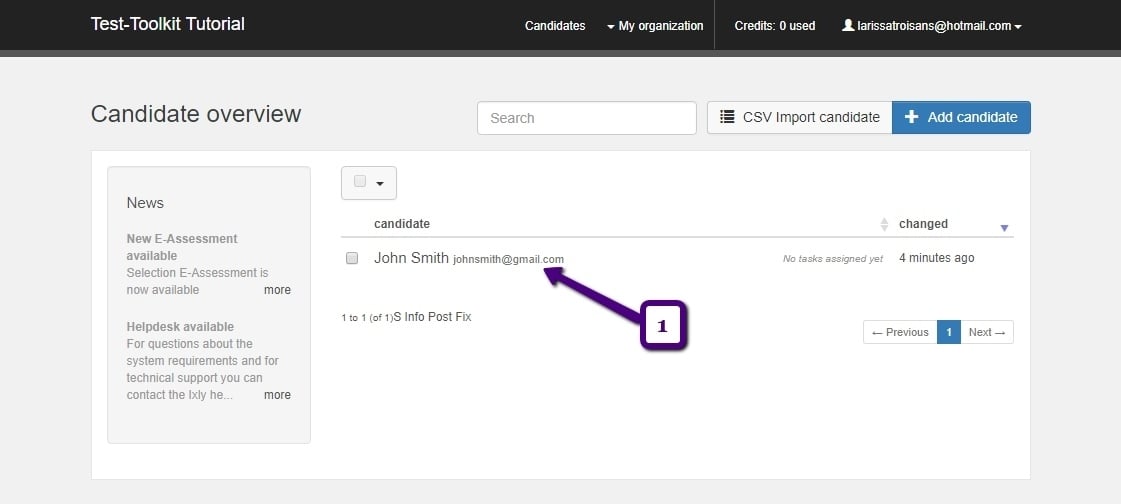
Click the name of any one candidate to assign tasks to them.
 2
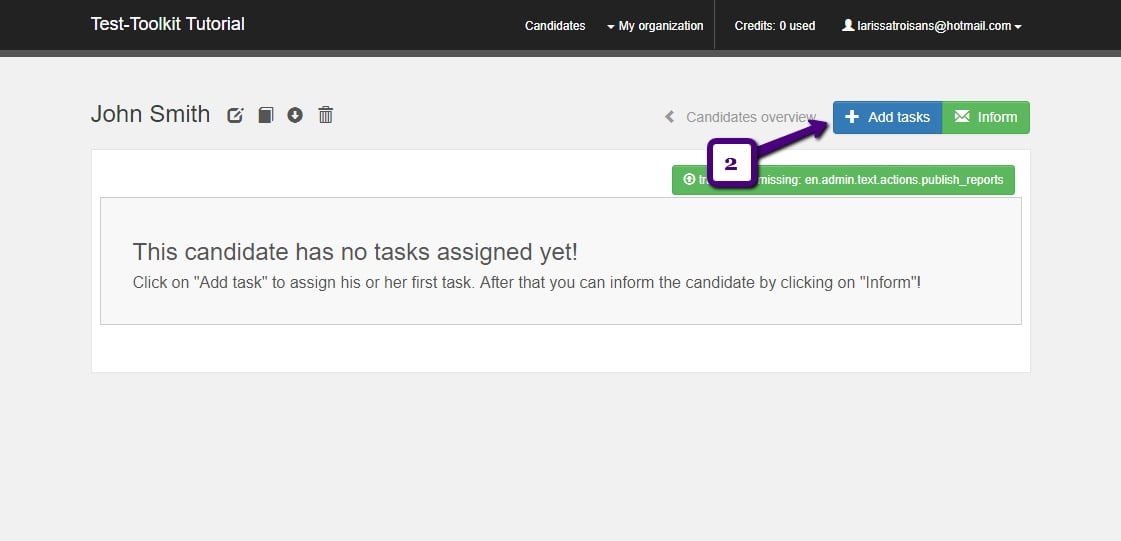
2Click ‘Add tasks’.
 3
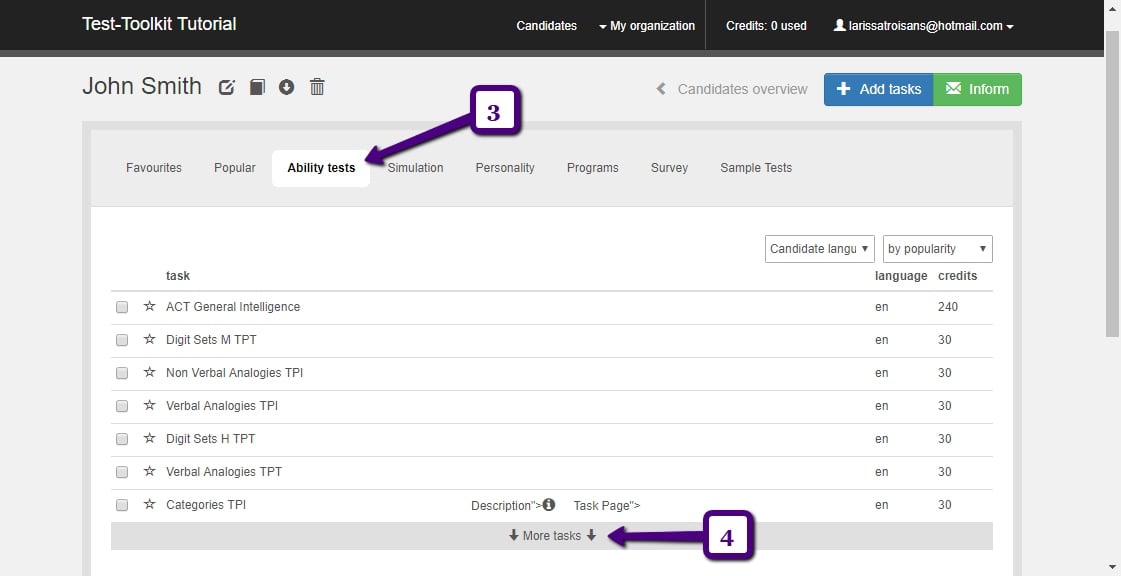
3Find the tasks that you wish to assign to the candidate. They are grouped under various headers; the header that is currently selected will be white. In this case, the selected header is ‘Ability tests’.
To view all of the tasks under a certain header, click ‘More tasks’.
 4
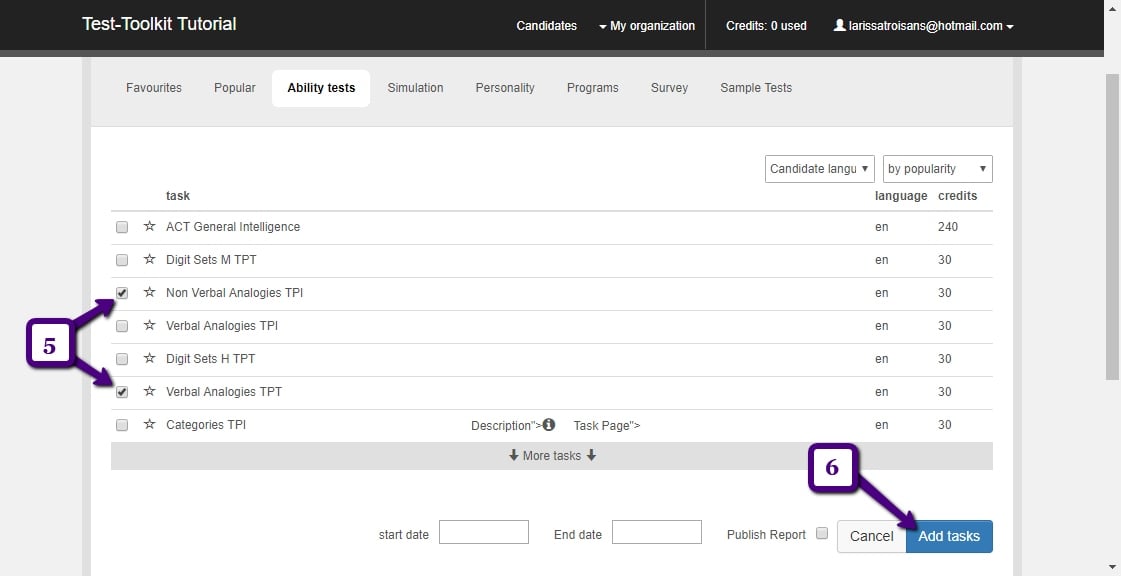
4Select the tasks that you wish to assign to the candidate by checking the boxes in front of the desired tasks.
Click ‘Add tasks’.
 5
5You will automatically be taken to the next page.
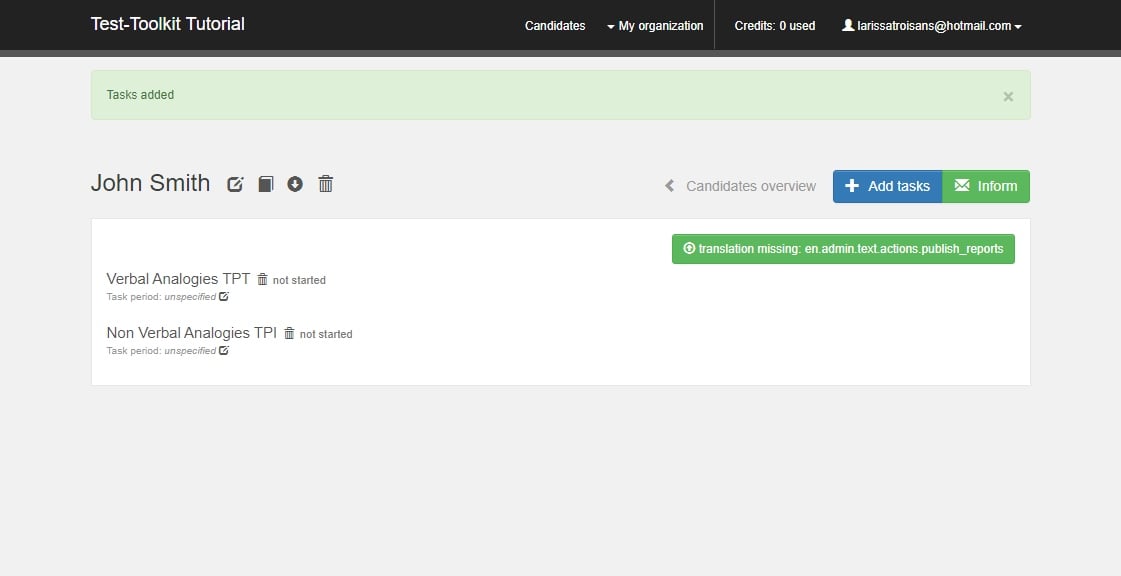
The tasks are now awaiting the candidate.
-
Comment puis-je réinitialiser une tâche ou la retirer?
1
Go to the candidate overview. Click the name of the candidate whose task needs to be reset. You will be taken to the candidate’s task overview.
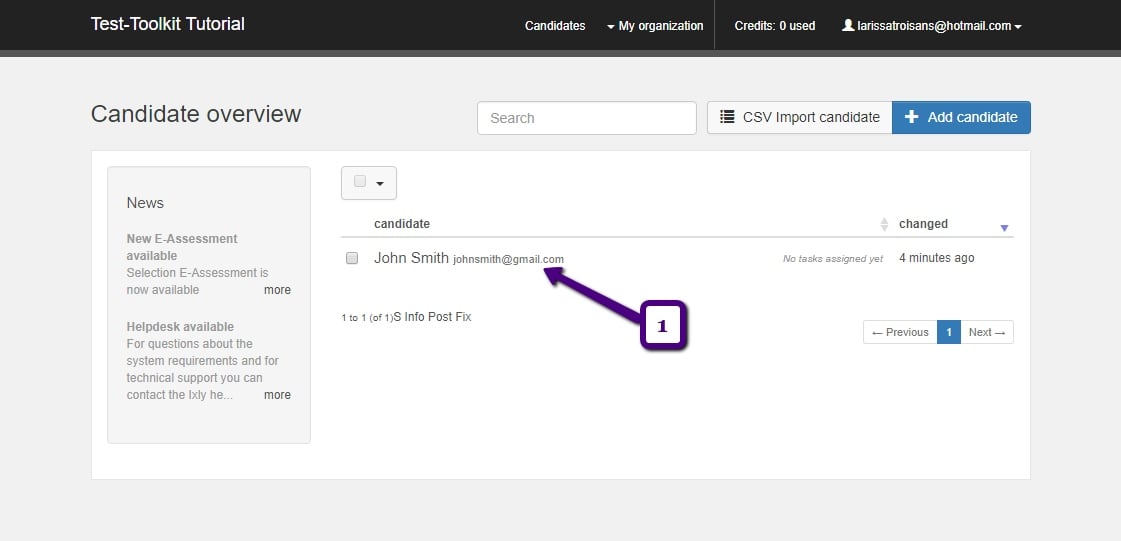 2
2Click the asterisks to the left of ‘started’, as shown in the image. The task will now automatically be reset.
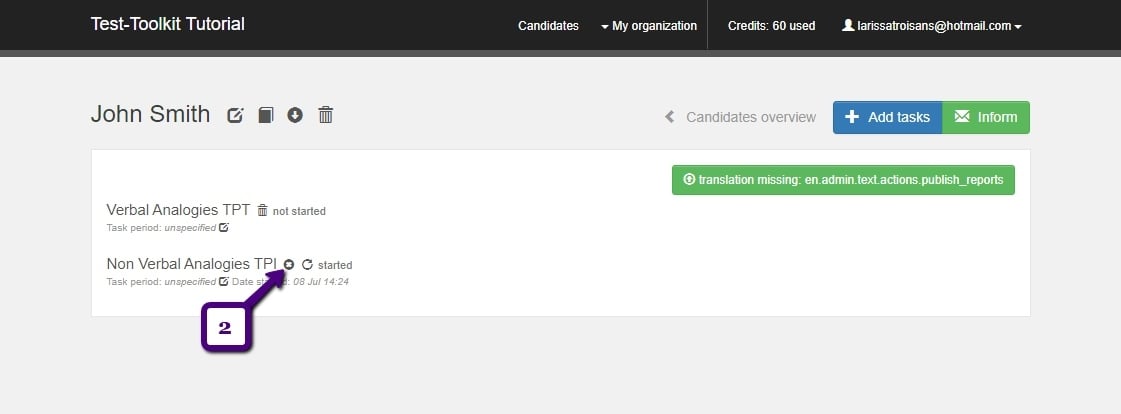 3
3Once it has been reset, the page will look like this. As you can see, the task status has reverted back to ‘not yet started’.
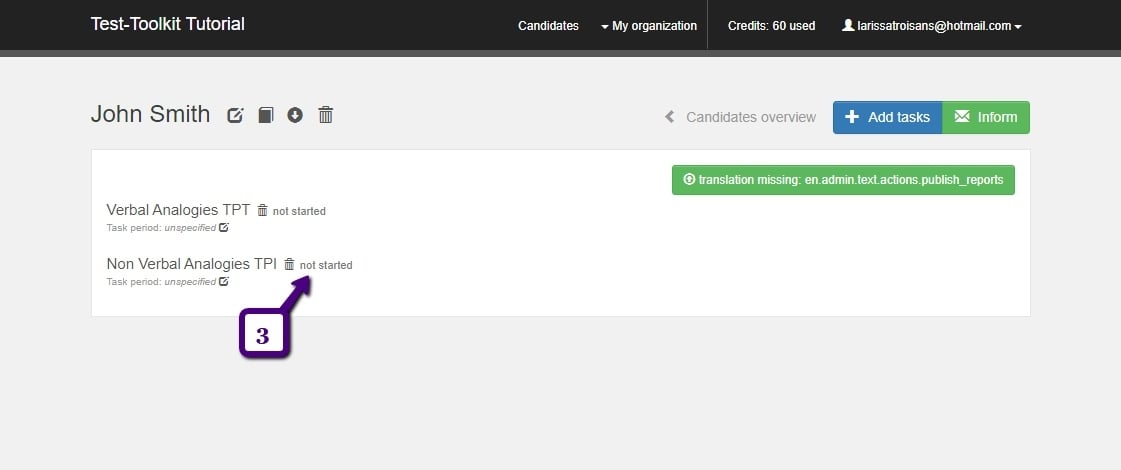 4
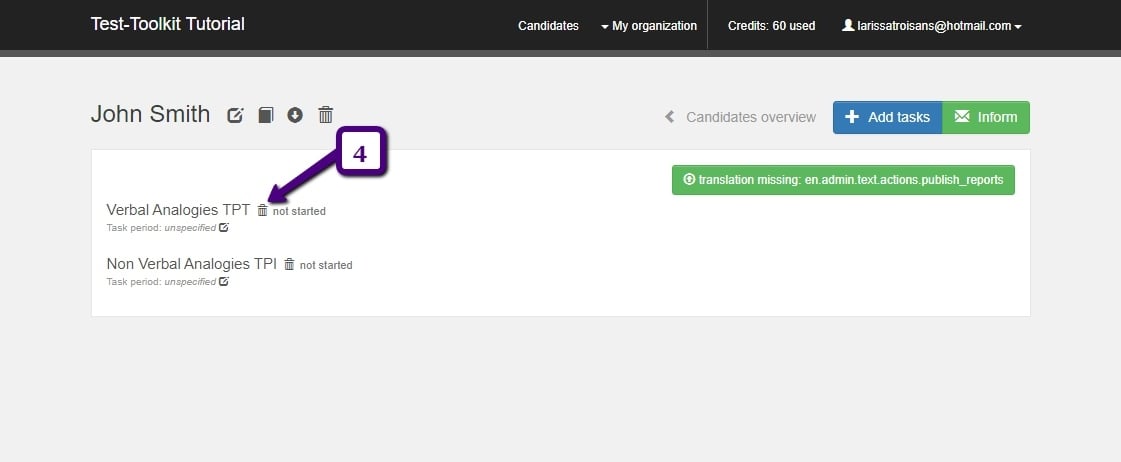
4If you then want to revoke the task altogether, do the following:
Click the trashcan to the left of ‘not yet started’, as shown in the image above. The task will now be removed from the candidate’s task list. If the candidate has not started the task yet, you do not need to reset it before you revoke it. Instead, simply click the trashcan right away to remove the tasks from the candidate’s task list.
-
Comment puis-je modifier les données de mon candidat?
1
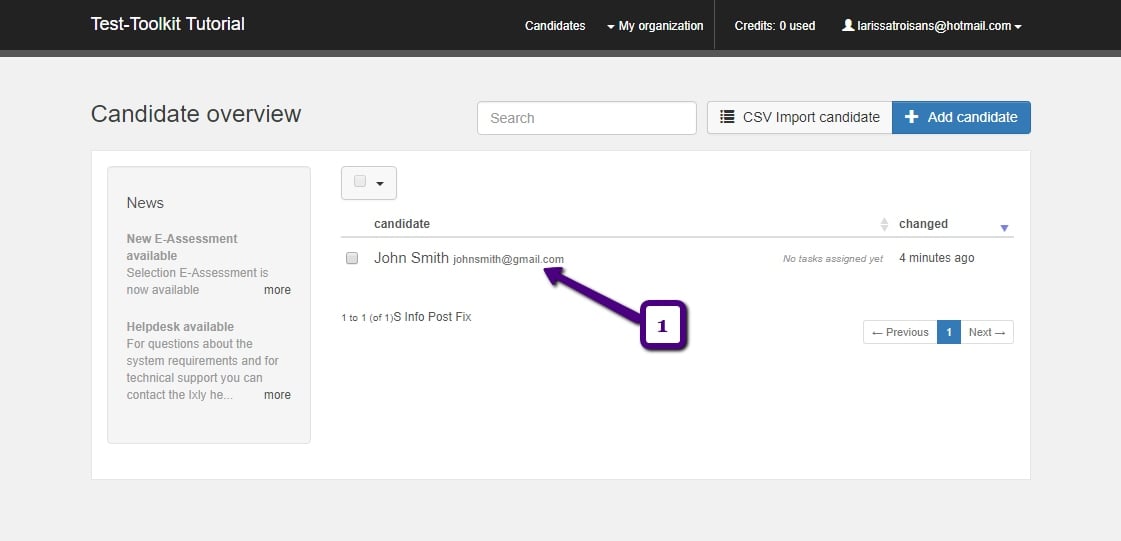
Go to the candidate overview. Select the name of the candidate whose personal information you want to edit. You will be taken to the candidate’s profile page.
 2
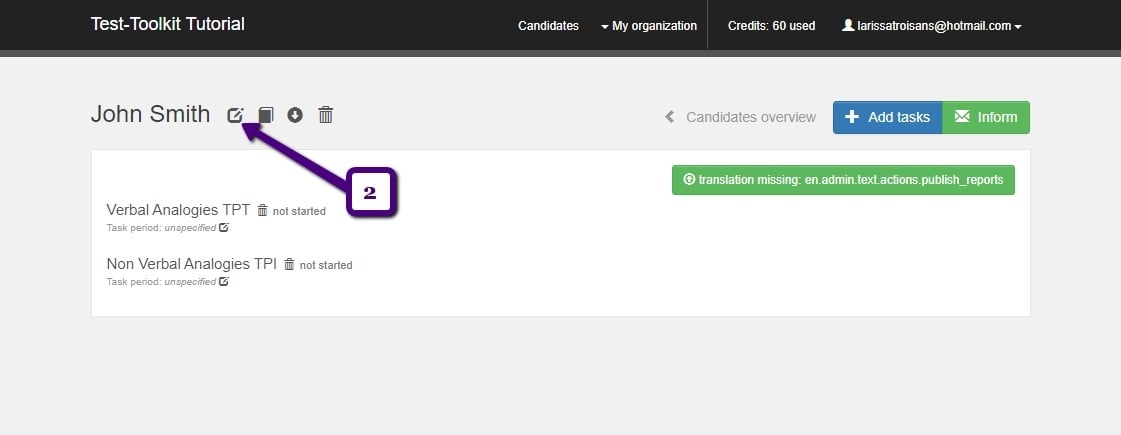
2Click the icon to the right of the candidate’s name to edit the candidate. You will be taken to the candidate’s personal information page.
 3
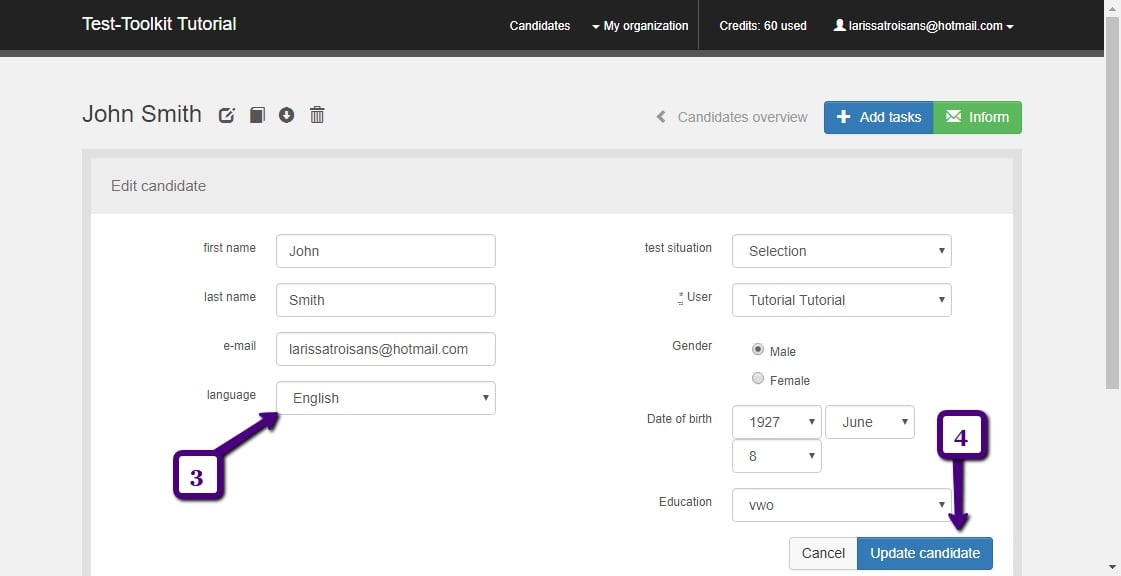
3Make the necessary changes to the candidate’s personal information. For example, you can edit their language preference by clicking the arrow next to the language and selecting the preferred language.
 4
4Click ‘Save candidate’ to save the edited personal information.
-
Comment puis-je inviter un candidat à réaliser les tâches?
1
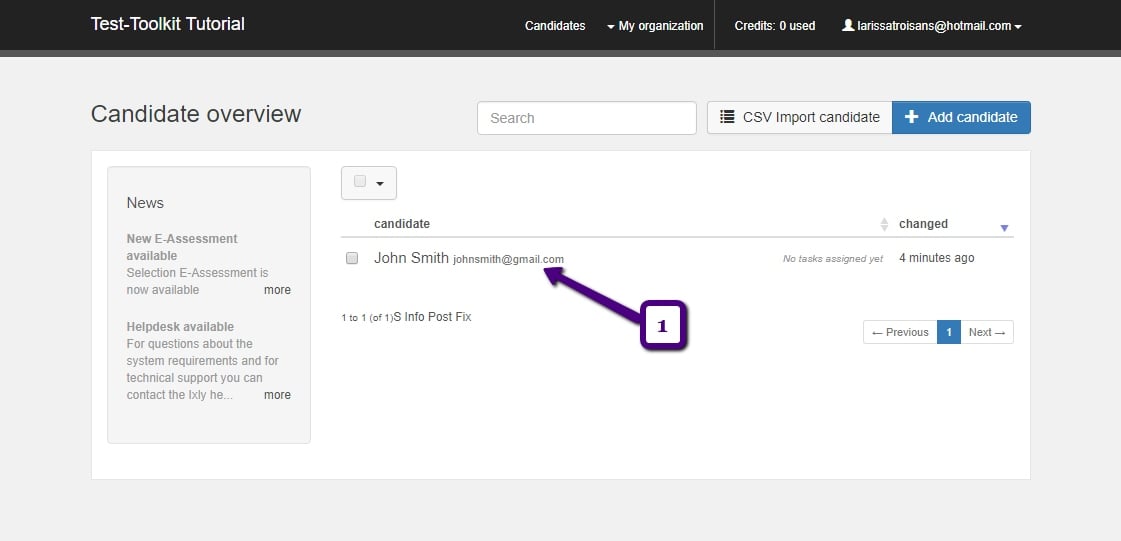
Go to the candidate overview. Select the name of the candidate whom you wish to inform of the fact that their tests are waiting for them. You will be taken to the candidate’s profile page.
 2
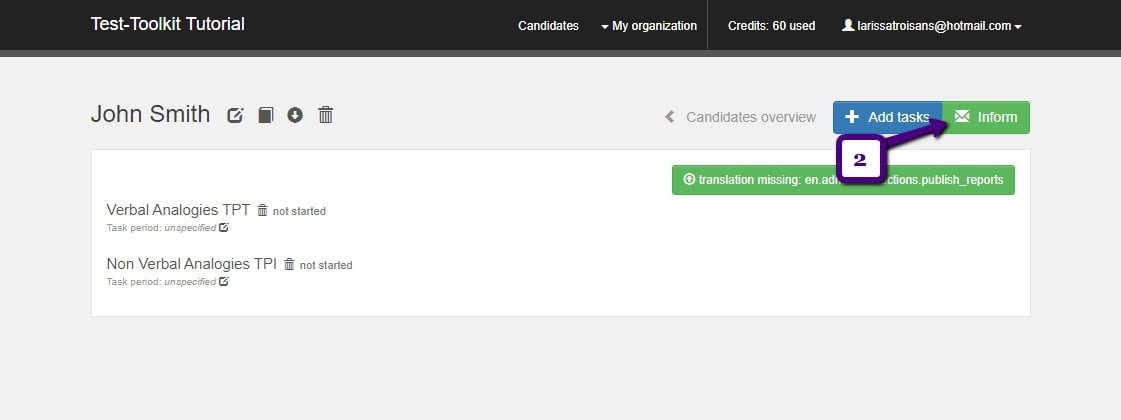
2Click ‘Inform’. You will then be shown a standard invite.
 3
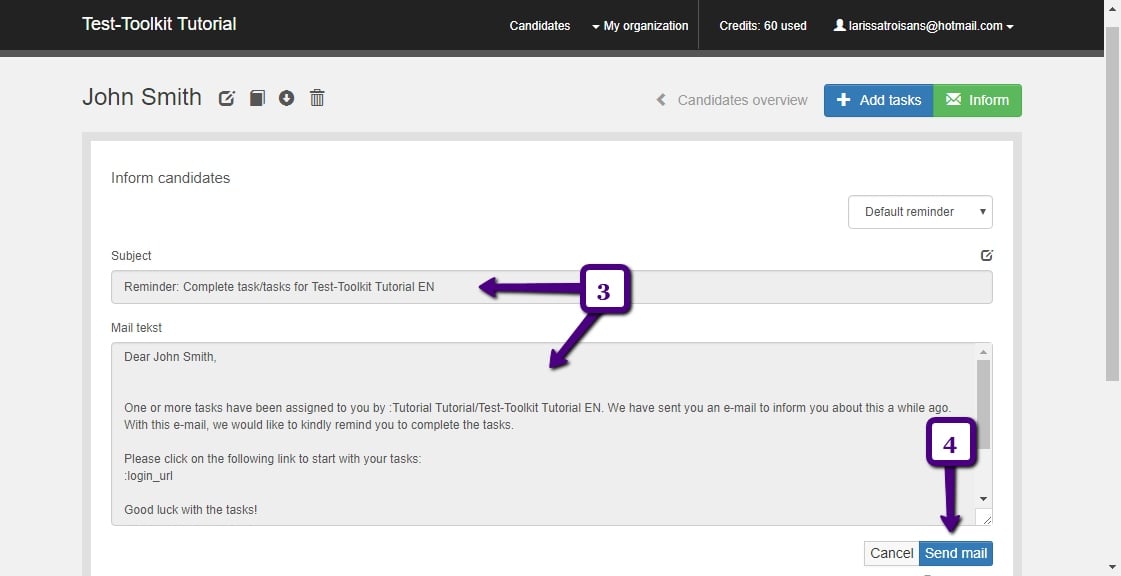
3You now have the option of changing the design or text content by first clicking the circled (red) pen and then clicking the text box you wish to edit. Please note that you should not remove the login_url! This is the link that the candidate will need to click to be able to complete their assigned tests.
Click ‘Send email’.
 4
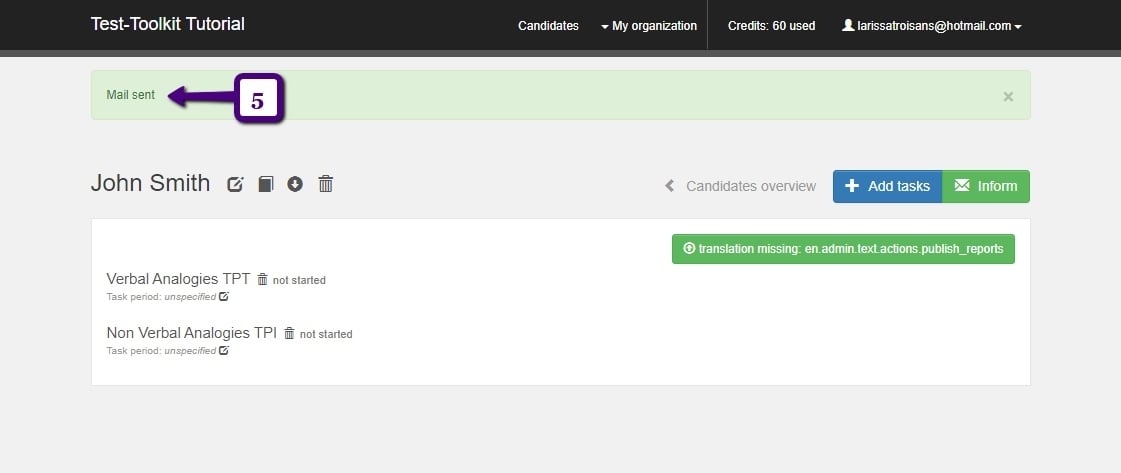
4A confirmation that your email has been sent will appear at the top of the screen. This means that the candidate has received your invite at the email address listed in their profile.
-
Comment le candidat effectue-t-il les tâches préparées?
1
First of all, the candidate can be sent word via the Test-Toolkit; please be referred to: How do I invite a candidate to complete their tasks.
The candidate will then receive an email containing a URL. Clicking this URL will allow them to start completing their tests right away.
2The second option is for you to log in as the candidate, by doing as follows.
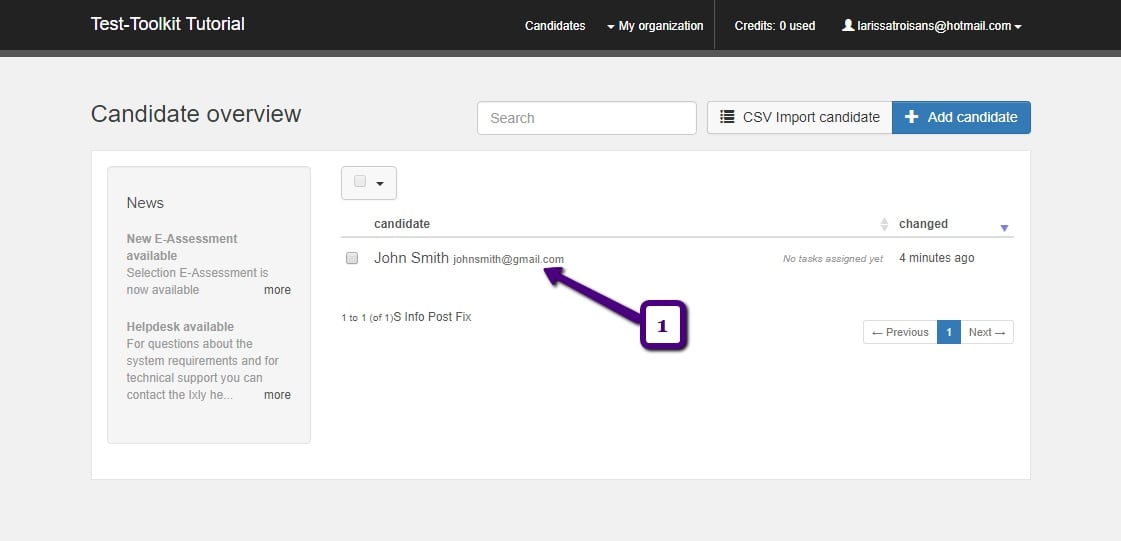
(1) Go to the candidate overview.
(2) Select the name of the candidate. You will be taken to the candidate’s profile page.
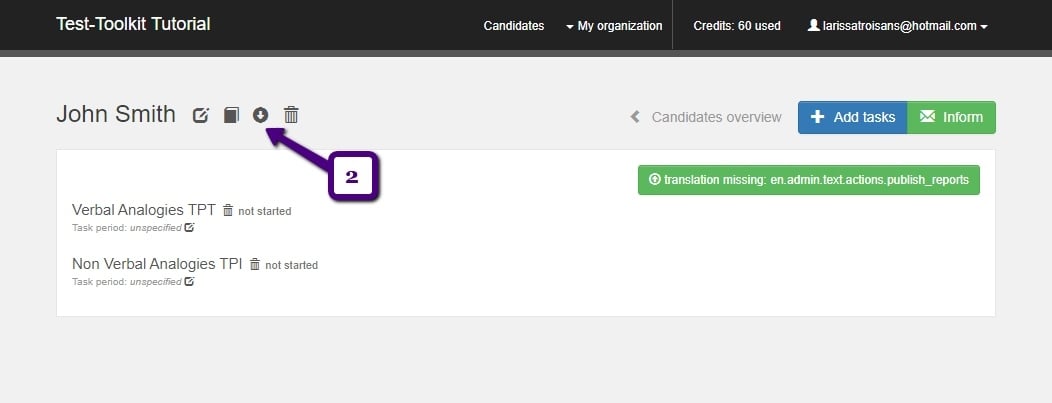
(3) Click the arrow next to the candidate’s name to log in as the candidate. You will be taken to the candidate’s task overview, the same one the candidate would see if they logged in themselves.
From there, the candidate will be able to complete their tasks by clicking ‘start’.
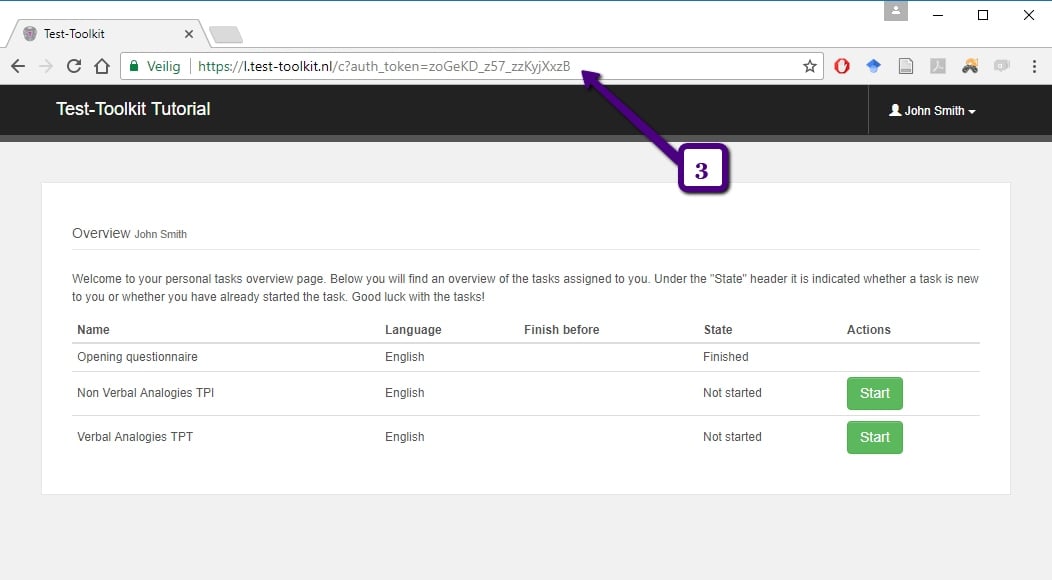
(4) Another option is for you to copy paste the URL and provide it to the candidate.
-
Comment puis-je savoir si un candidat a terminé ses tâches?
1
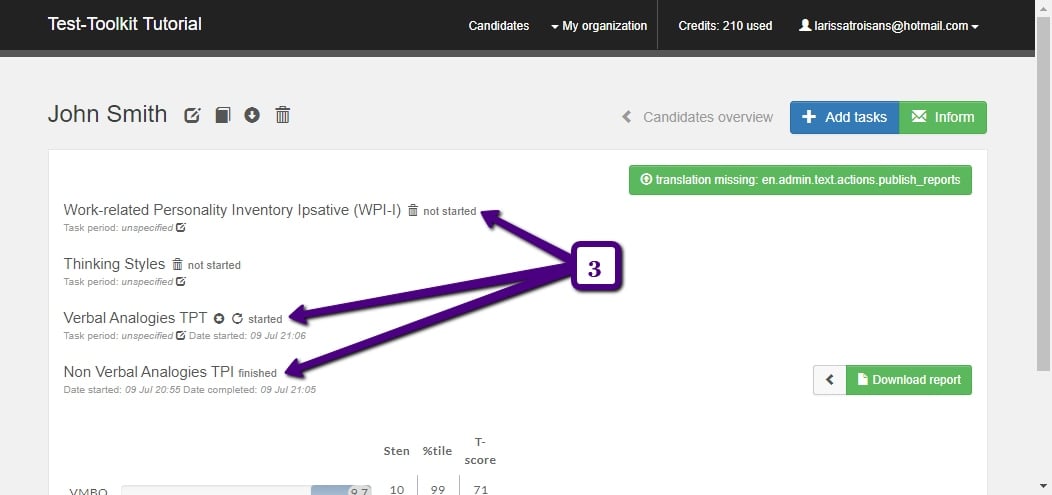
First of all, you can review the status of the candidate’s tasks in the candidate overview.
(1) The various colours in the bar next to the candidate indicate the status of their various tasks.
- Green = number of completed tests.
- Blue = number of started tests.
- Grey = number of tests that have not been started yet.
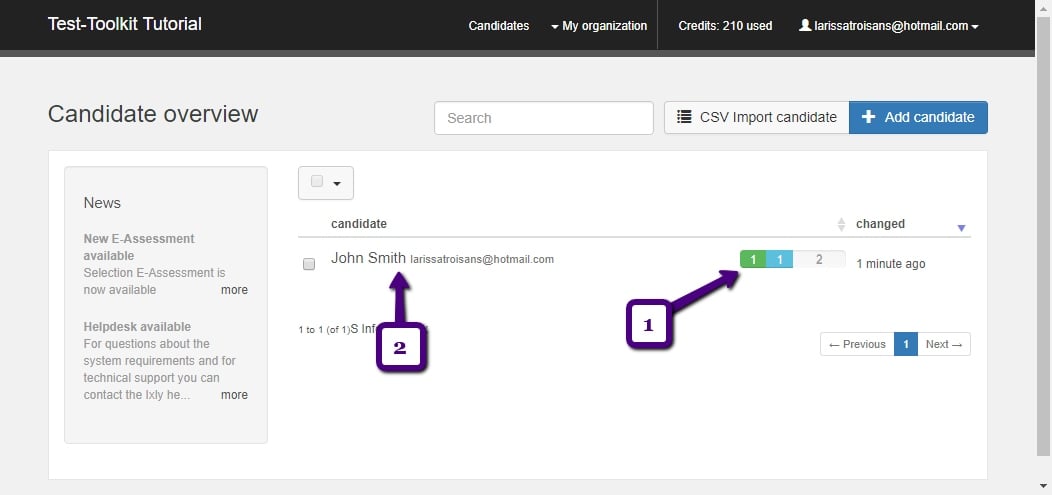
(2) You can also go to the candidate’s profile to review their tasks’ statuses. To do so, select the name of the candidate. Each task’s status will be listed on their task overview; started, completed, or not yet started.
 2
2Another way to tell whether candidates have completed their tasks is by having an email sent to you once they complete one or more tasks. You do so via the profile settings.
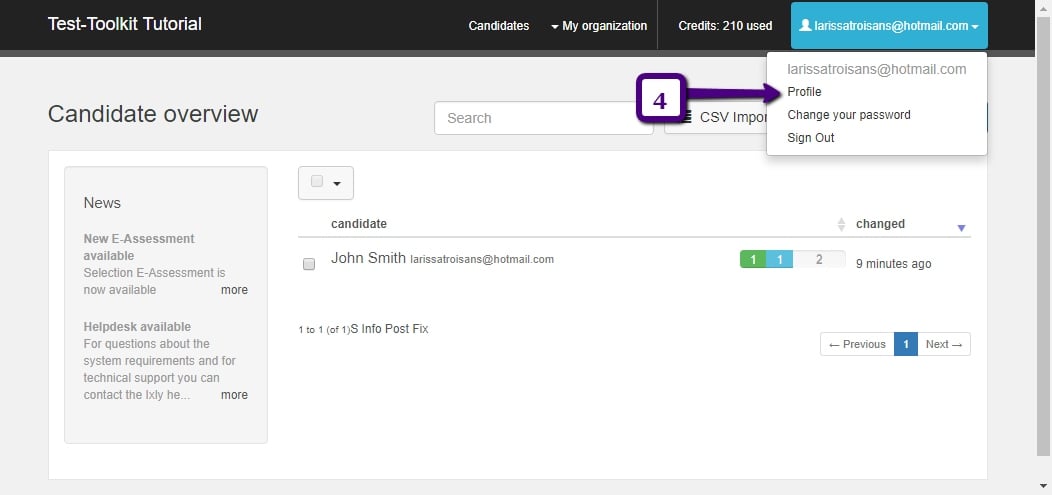
(1) Click the arrow next to the email address and select ‘Profile’.
(2) You will be taken to the following page. Here you will be able to select whether an email should be sent to you once a candidate has completed all of their tasks, or whether a separate email should be sent for each task. Selecting either one of these options will thus result in you being sent emails to indicate the candidate’s progress.
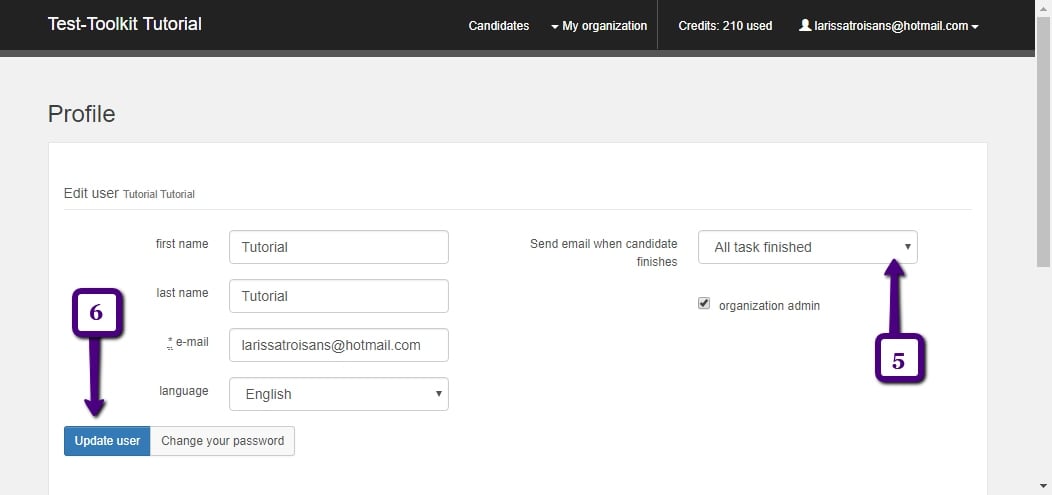
(3) Save the changed settings by clicking ‘Save user’.
-
Comment puis-je demander les rapports?
1
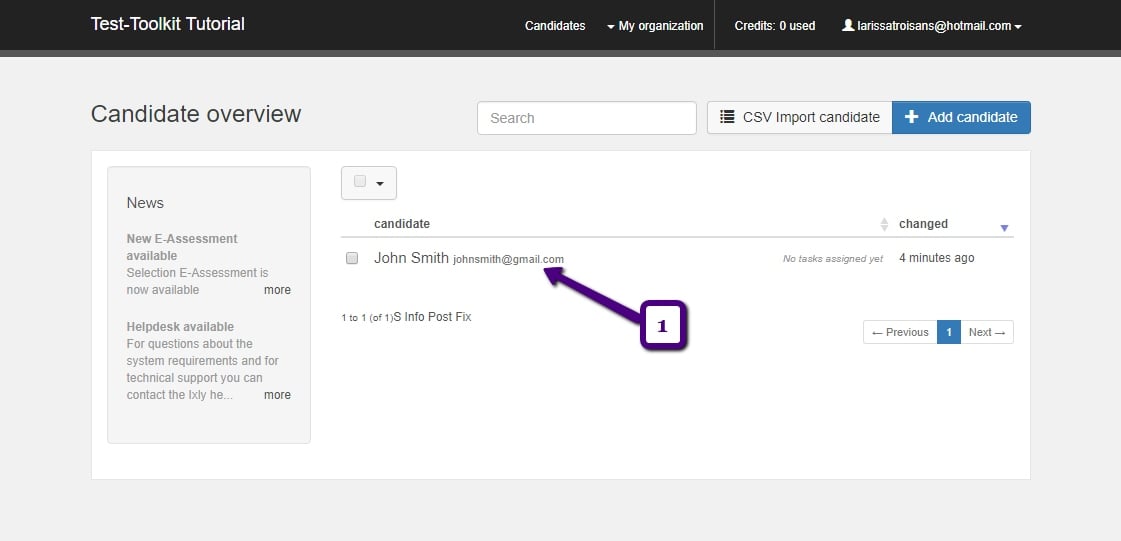
Go to the candidate’s profile by selecting their name.
 2
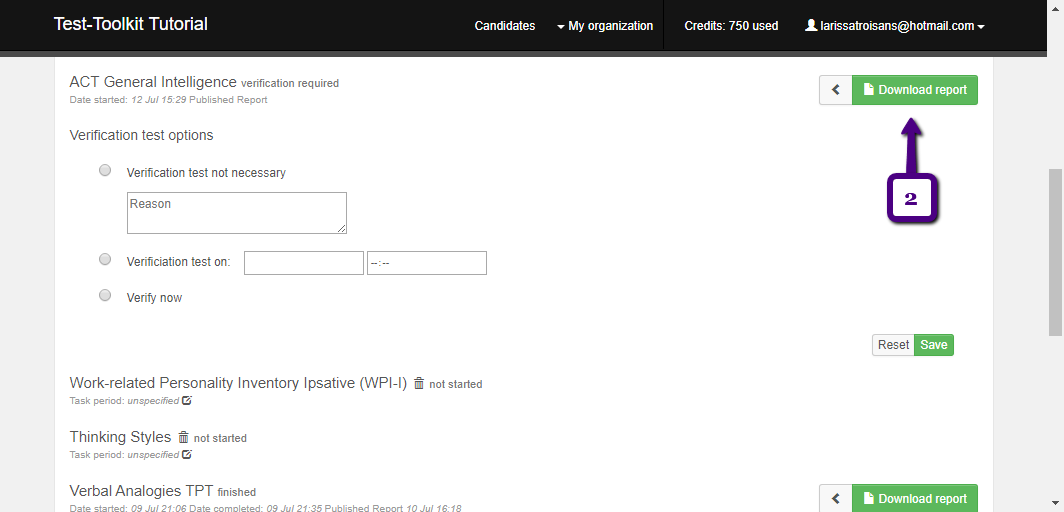
2For the tests that have been completed, you will have the option of selecting ‘Download report’. If you select that option, the download will automatically initiate. Depending on your browser, it will then appear in the bottom left (Chrome) or top right (Firefox).
 3
3You also have the option of requesting a report in line with your wishes; for example, you have the option of choosing which baseline groups the candidate’s results are to be compared to.
To download such a report, complete the following steps.
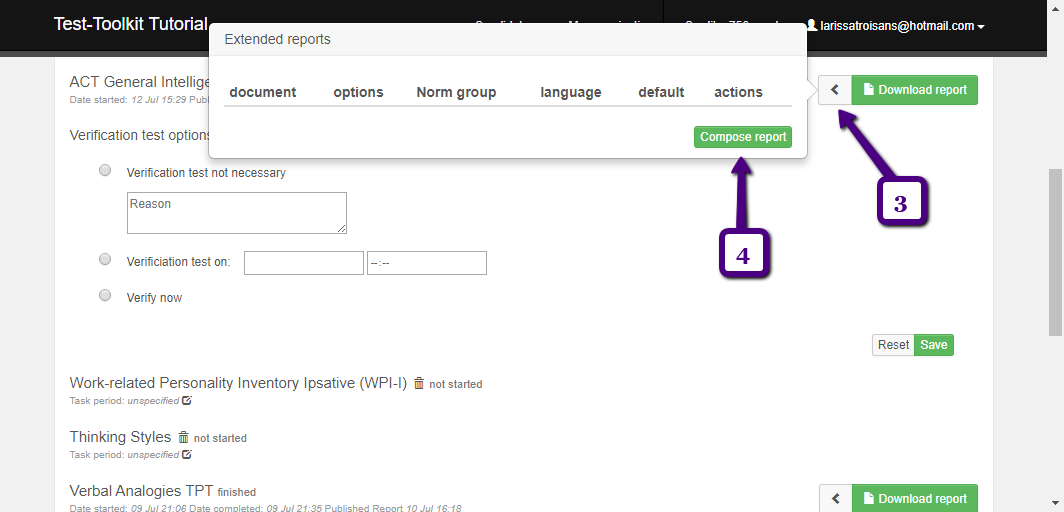
(1) Click the arrow next to ‘Download report’.
(2) Then click ‘Compile report’.
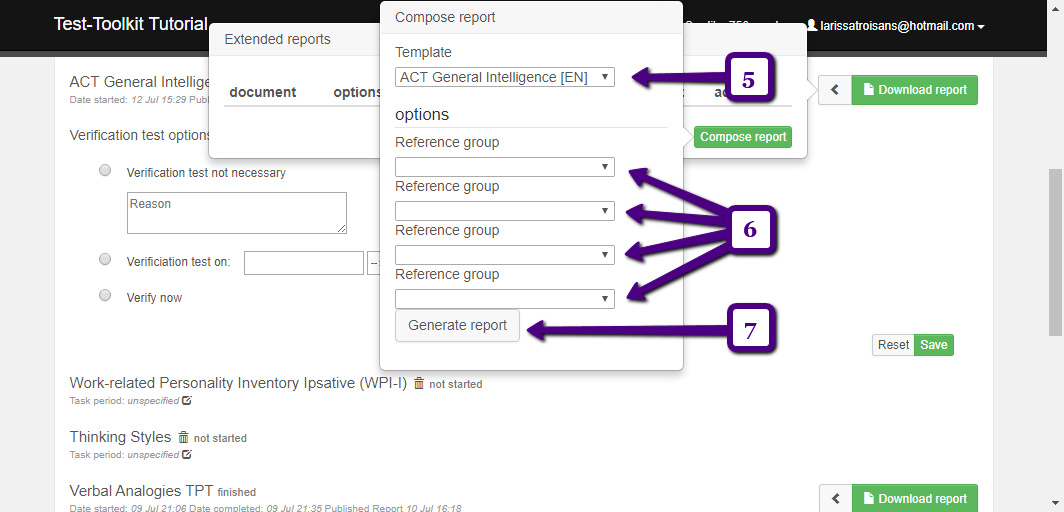
(3) You will be shown the following overview. Select the template you want the report to be based on by clicking the arrow next to ‘(Standard) NL’.
(4) Indicate which baseline groups the candidate’s results should be compared to.
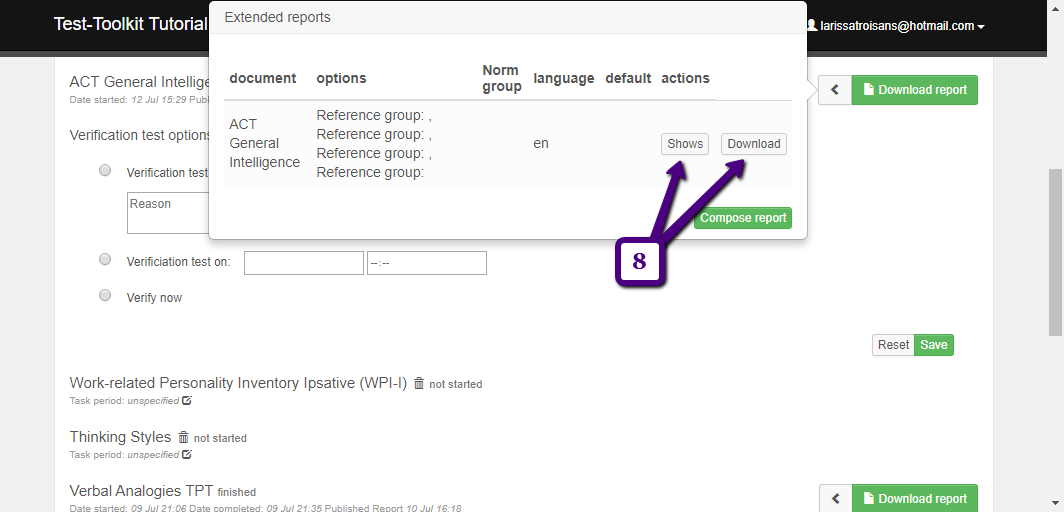
(5) Click ‘Generate report’. A new row will now be added to the list of downloadable reports.
(6) You will now be able to download the report by clicking ‘Download’, or only view it by clicking ‘Shows’.
-
Comment puis-je demander un rapport collectif?
1
Access the candidate’s profile via the candidate overview by selecting their name.
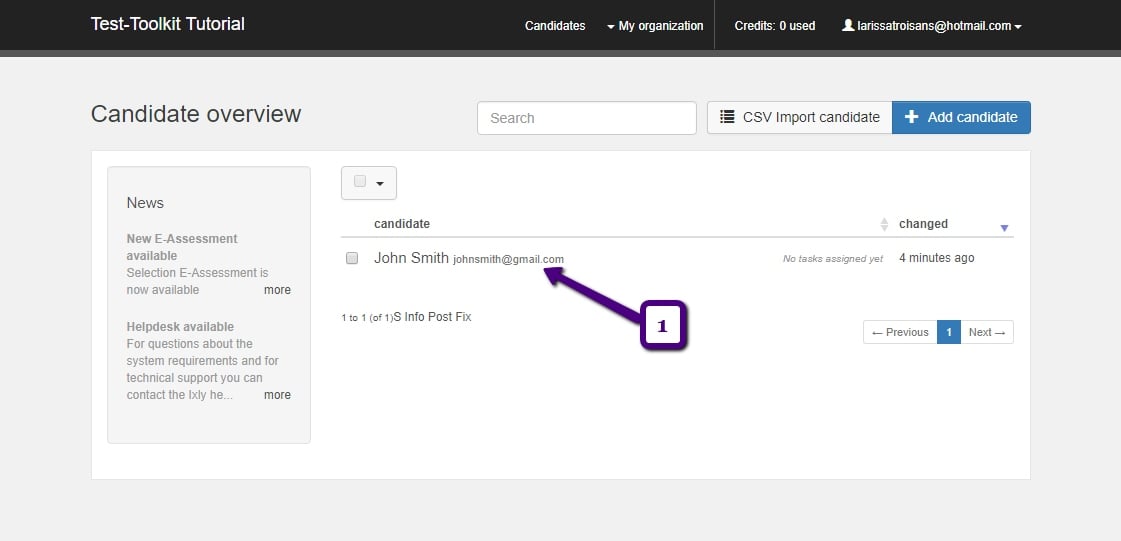 2
2You will be taken to the candidate’s profile, where you will be able to select ‘Overall report’.
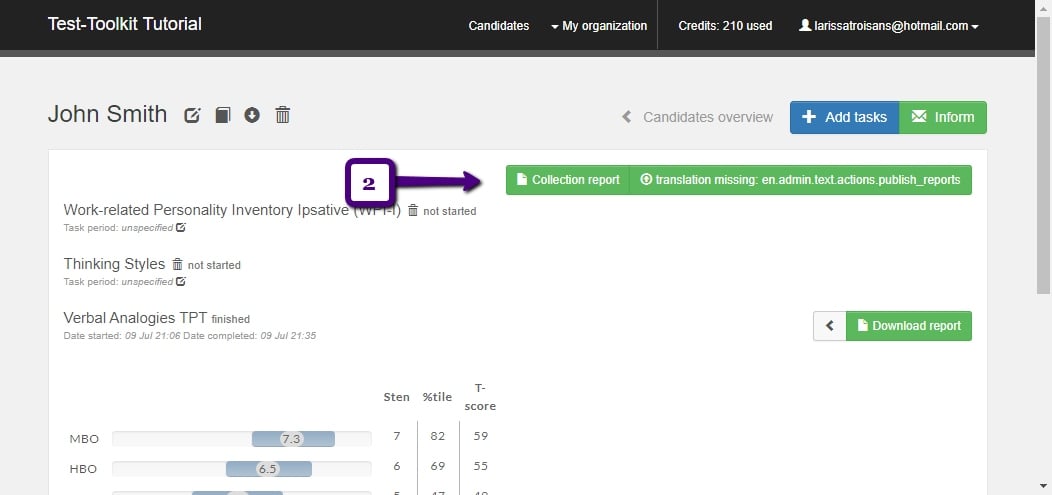 3
3You will then be taken to the following page.
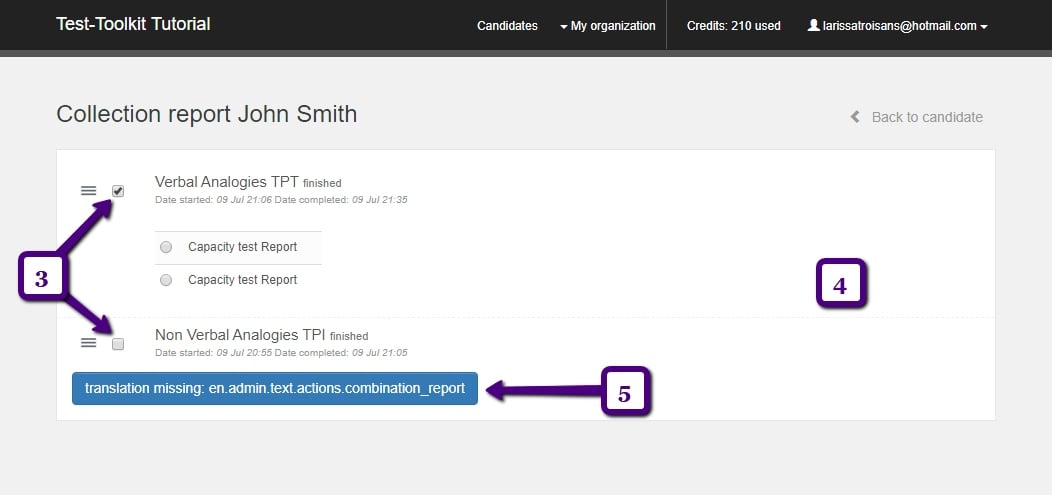
(3) Here, you will be able to specify which of the tests should be included in the overall report by checking the boxes next to the relevant tests.
(4) You can also edit the order in which the results will appear by selecting the boxes and moving them up or down.
(5) Once you have set everything according to your preferences, click ‘Generate overall report’. A download will automatically be initiated. Depending on your browser, it will then appear in the bottom right (Chrome) or top left (Firefox).
-
Comment puis-je modifier un rapport?
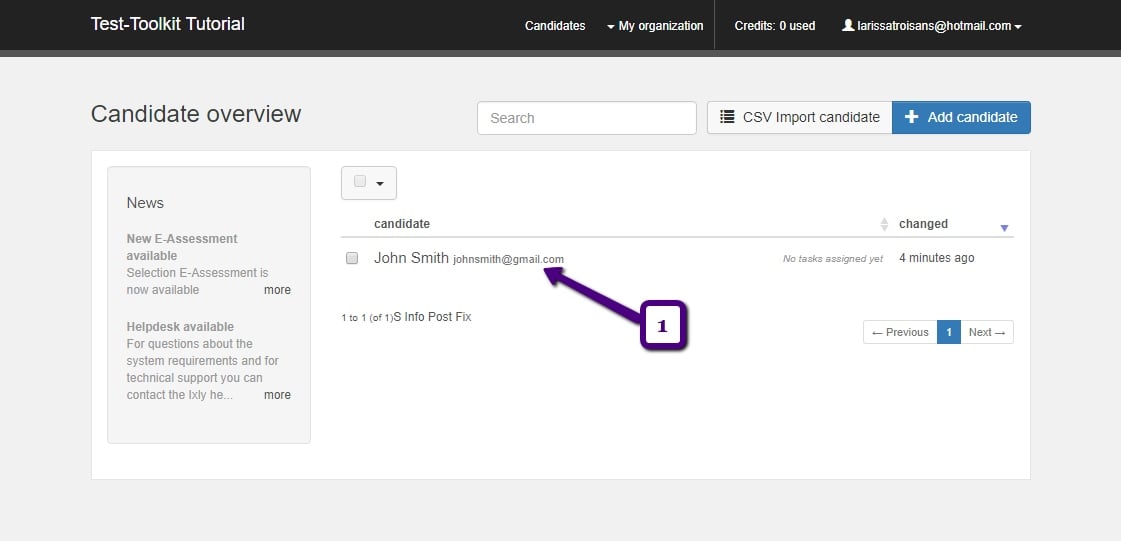
1
Select the name of the candidate to access their profile. The tasks that have been assigned to them will be listed there. For the tests that have been completed, you will have the option of downloading a report.
 2
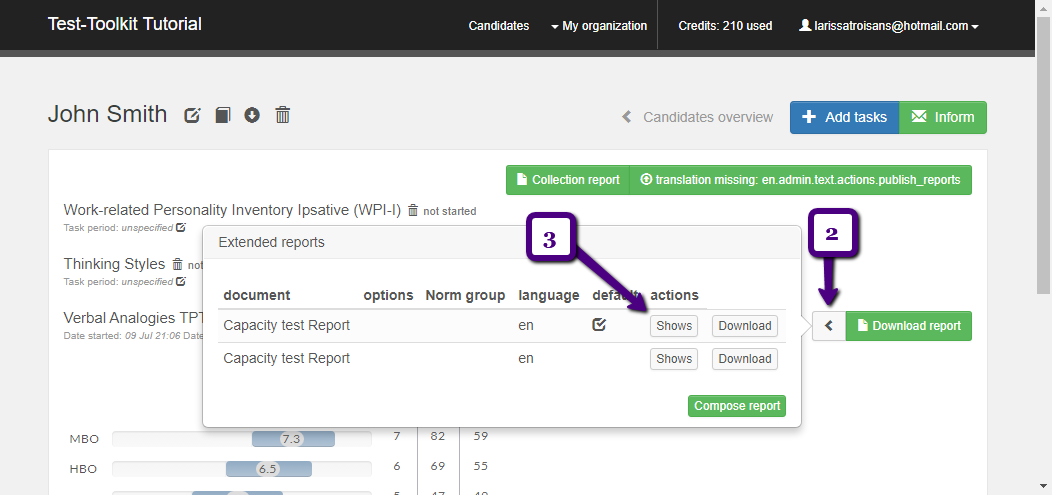
2Click the arrow next to ‘Download report’.
Click ‘Shows’; you will now see the report in your browser.
 3
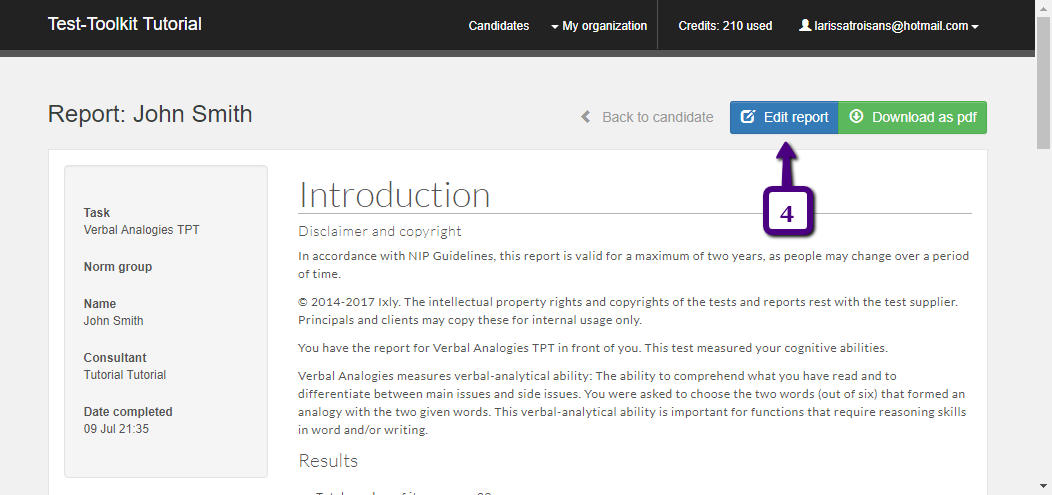
3Click ‘Edit’ to make changes to the text.
 4
4(5) Click any textbox to edit the text thereon. For example, clicking the ‘introduction’ textbox will allow you to change the title. You will be able to make changes to any text box by selecting them.
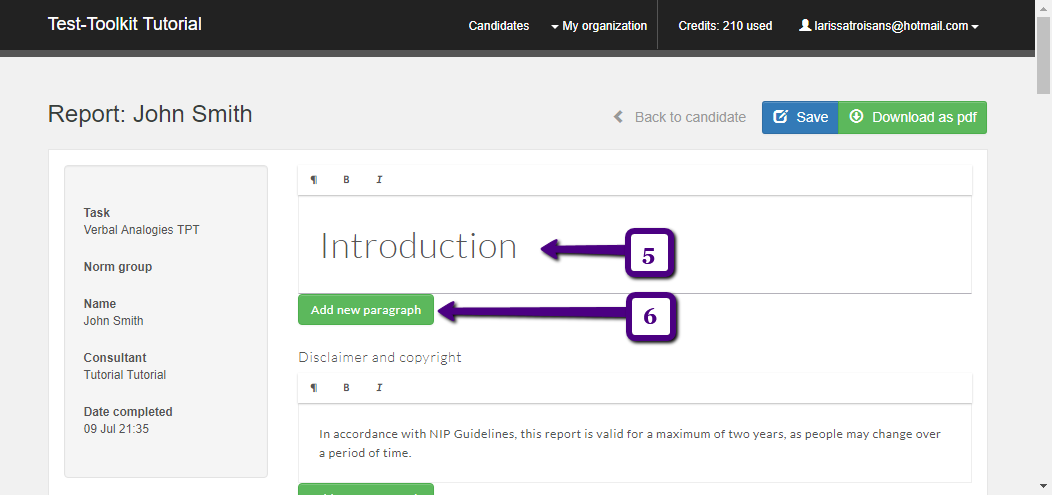
(6) If you click ‘Add new paragraph’, you will be able to add a new paragraph; a new textbox will be added in which you will be able to enter text of your own.
5(7) You also have the option of editing the text’s layout. You can use the B to turn any text into bold text, and the I to turn any text into cursive text. There are also a number of standard options, such as for the title (Header 1) to be larger, which are listed under ¶.
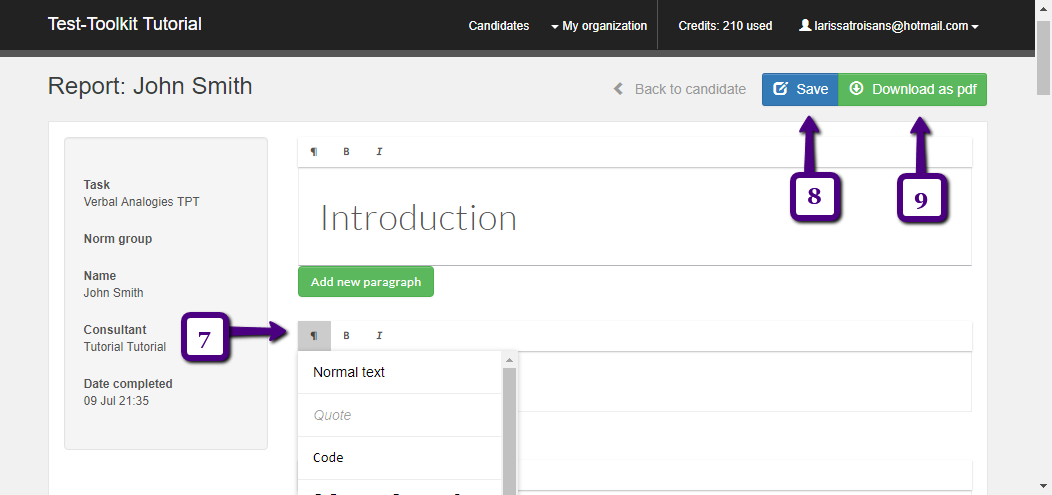
(8) Once you are satisfied about the changes you have made, click ‘Save’.
(9) You will then be able to download the report by clicking ‘Download as pdf’.
-
Comment un candidat peut-il comprendre le rapport?
1
First, go to the candidate overview, the first page you see after logging in. If you are already logged in and on a different page, you can access the candidate overview by clicking ‘Candidates’.
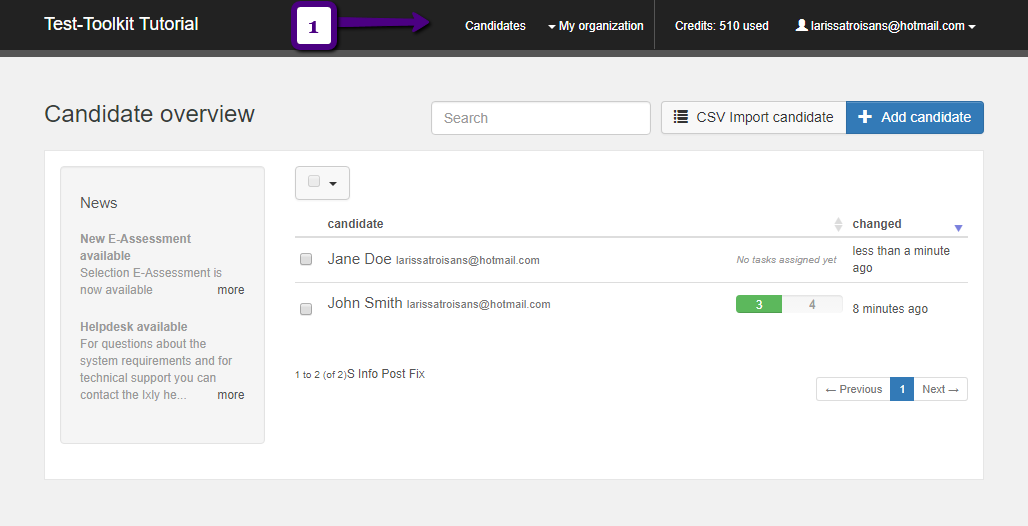 2
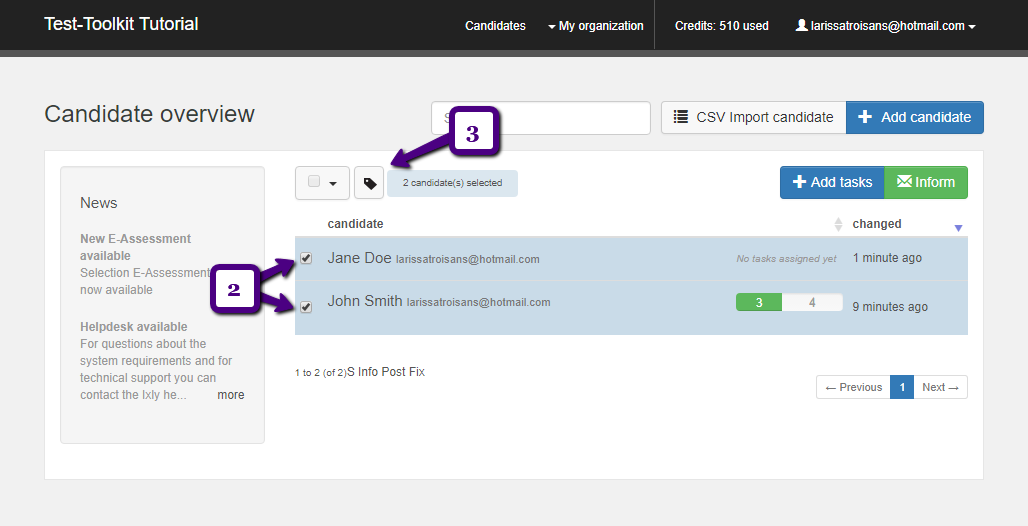
2(2) Select the name of the candidate. An extra icon will then appear at the top of the candidate list.
(3) Click the label icon as shown in the image above.
 3
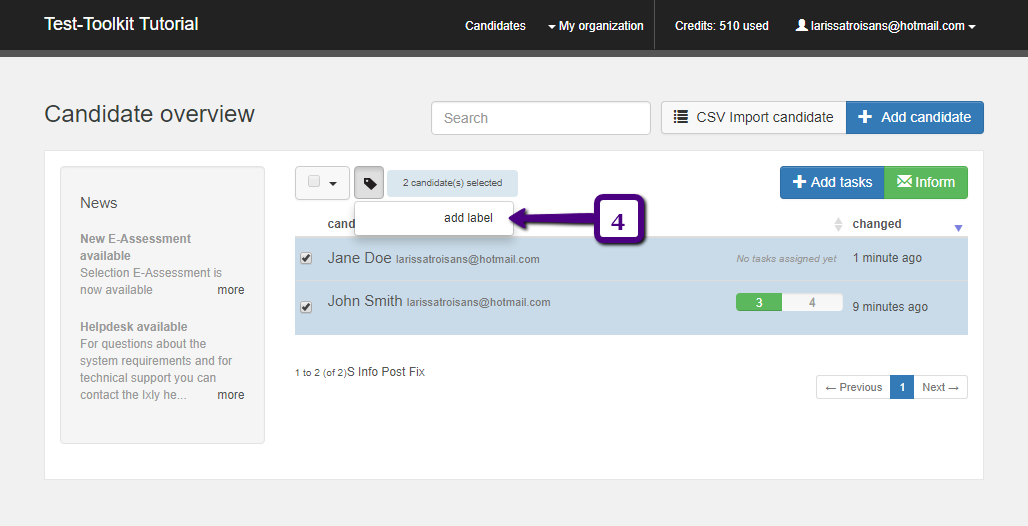
3Click ‘Add label’ to create a new label.
 4
4You will see the following:
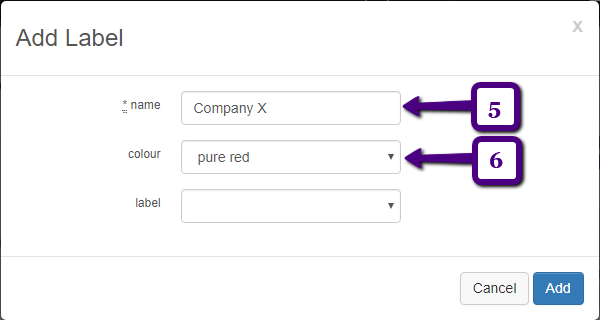
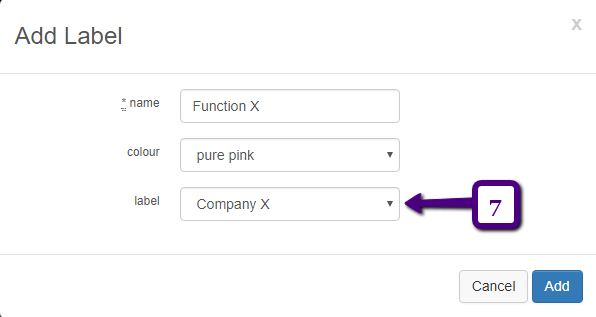
(5) Enter the label name.
(6) You will have the option of specifying the label colour to allow you to distinguish between labels even more easily.
5If you have created previous labels, you will be able to set one of them as the main label. For example, in the event that you are working on multiple assignments for a single company, you could create a main label with the company’s name, as well as sub labels with the assessment assignment’s name.
 6
6(8) Select the people that you wish to add to the label. Then click the label icon; a list of previously made labels will appear, and you will be able to select the desired label’s name.
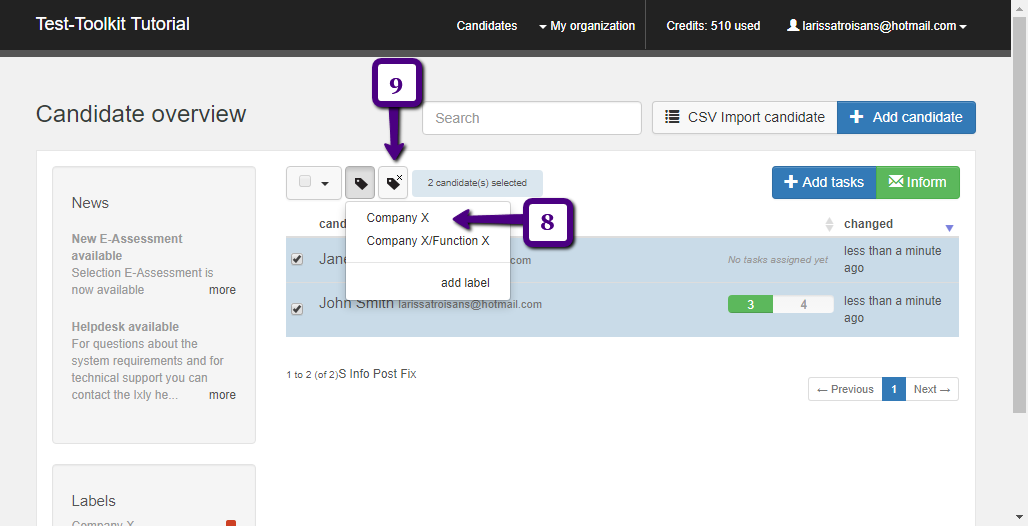
(9) If you want to remove a label, select the candidate for whom you want to remove the label, and then click the label icon as shown in the image above.
-
Comment étiqueter mes candidats?
1
First, go to the candidate overview, the first page you see after logging in. If you are already logged in and on a different page, you can access the candidate overview by clicking ‘Candidates’.
 2
2(2) Select the name of the candidate. An extra icon will then appear at the top of the candidate list.
(3) Click the label icon as shown in the image above.
 3
3Click ‘Add label’ to create a new label.
 4
4You will see the following:

(5) Enter the label name.
(6) You will have the option of specifying the label colour to allow you to distinguish between labels even more easily.
5If you have created previous labels, you will be able to set one of them as the main label. For example, in the event that you are working on multiple assignments for a single company, you could create a main label with the company’s name, as well as sub labels with the assessment assignment’s name.
 6
6(8) Select the people that you wish to add to the label. Then click the label icon; a list of previously made labels will appear, and you will be able to select the desired label’s name.

(9) If you want to remove a label, select the candidate for whom you want to remove the label, and then click the label icon as shown in the image above.
-
Comment puis-je ajouter un logo personnalisé?
1
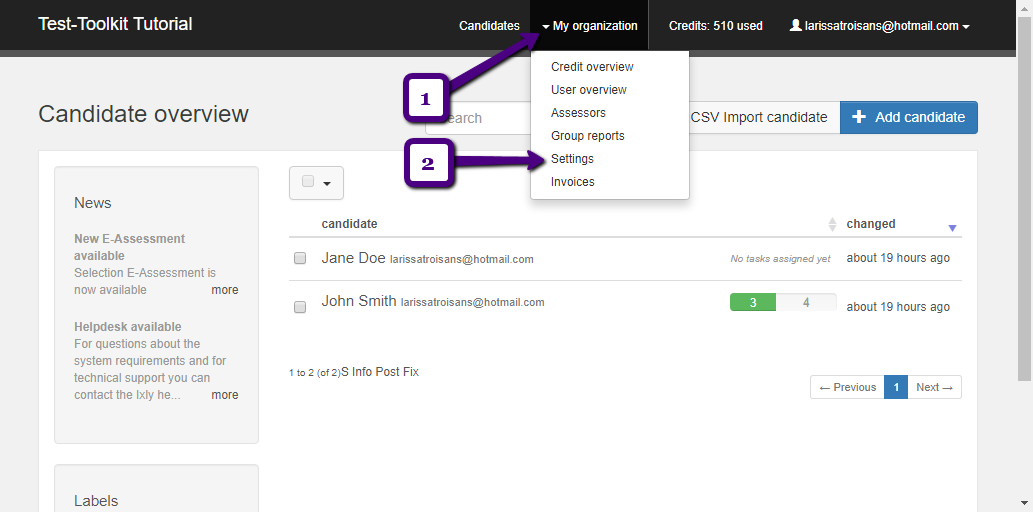
Click ‘My organisation’.
Click ‘Settings’.
 2
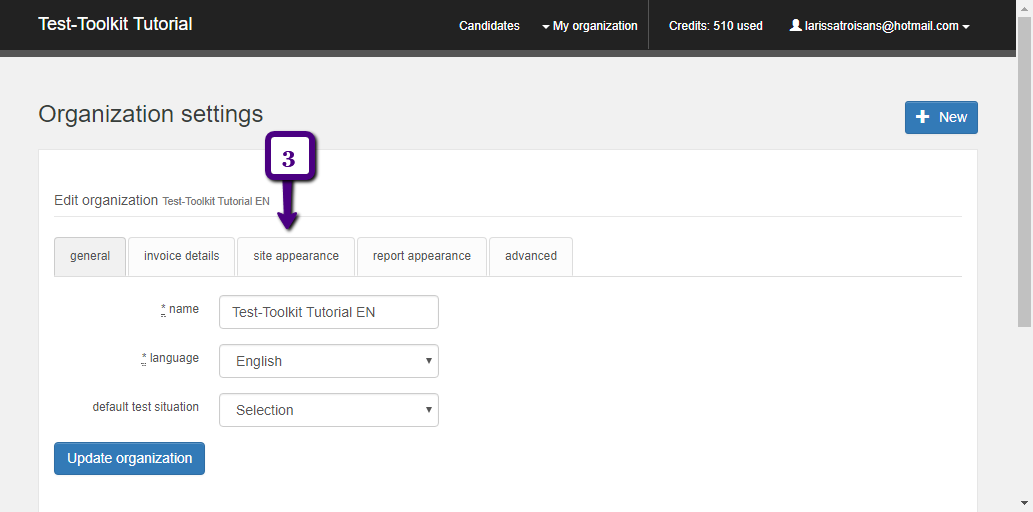
2You will be taken to your organisation's settings page. Choose ‘Site appearance’.
 3
3(4) Here, you will have the option of changing various settings, such as header colour, text colour, and background colour. You also have the option of uploading your logo. To do so, click ‘Select file’ and elect the desired file.
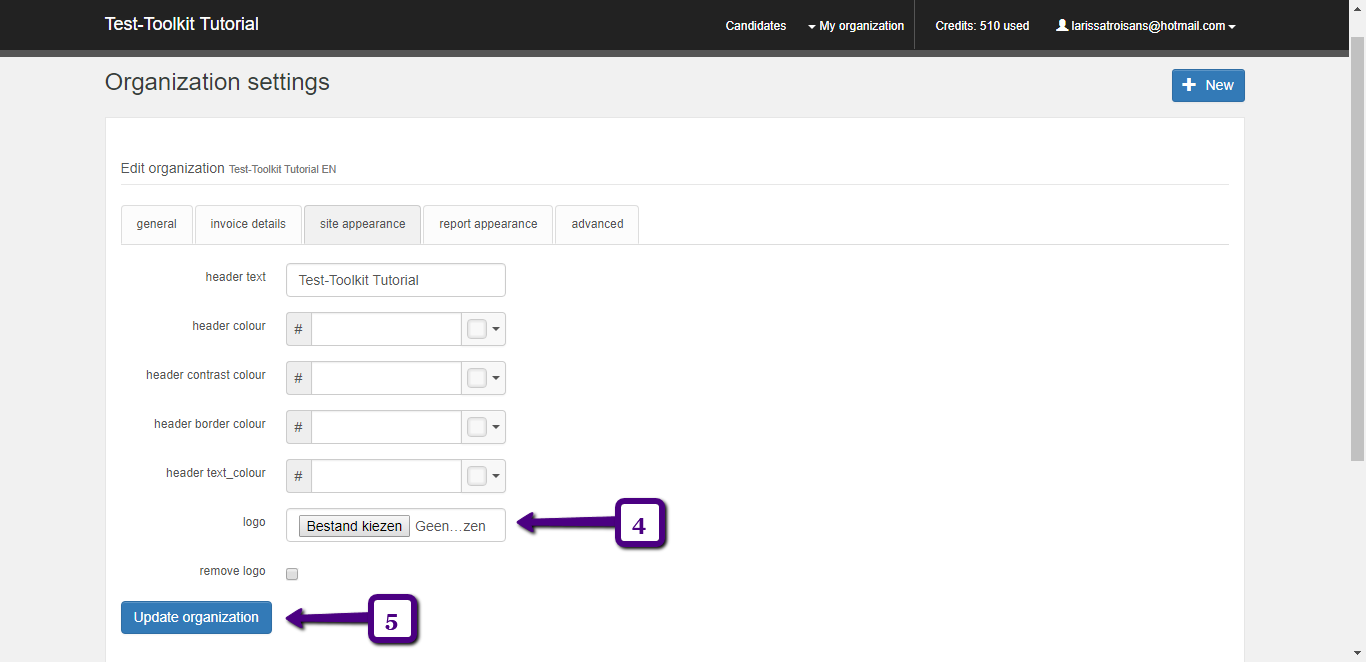
(5) Click ‘Save organisation’. Your settings will then be saved.
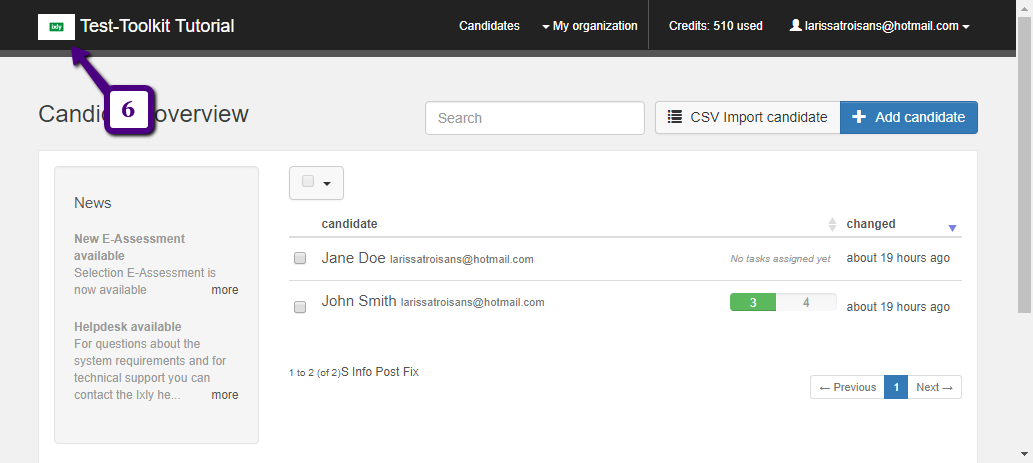
4If you then go to a different page, you will see that the page’s appearance will have changed. In the example below, the logo has been changed.
-
Comment puis-je modifier les couleurs de la boîte à outils de test?
1
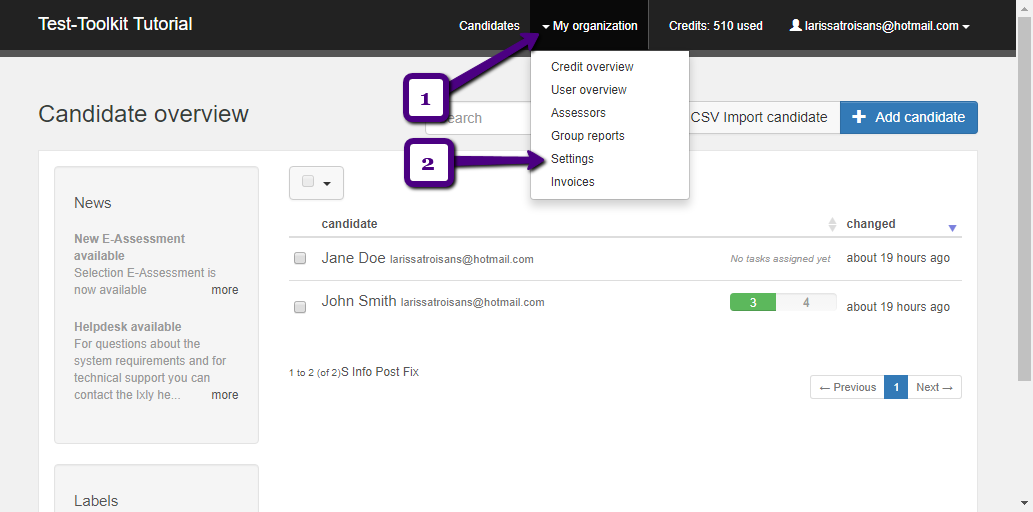
(1) Click ‘My organisation’.
(2) Click ‘Settings’.
 2
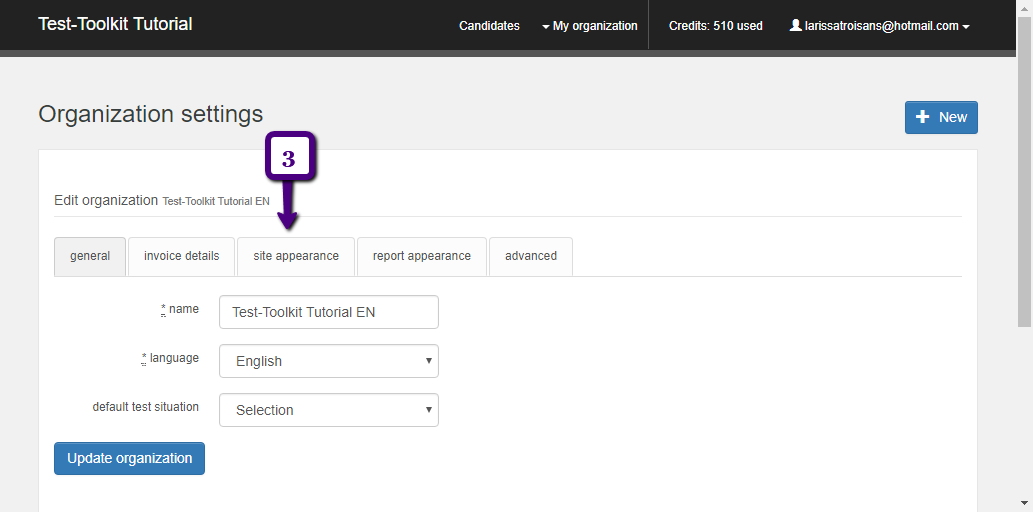
2You will be taken to your organisation’s settings page. Choose ‘Site appearance’.
 3
3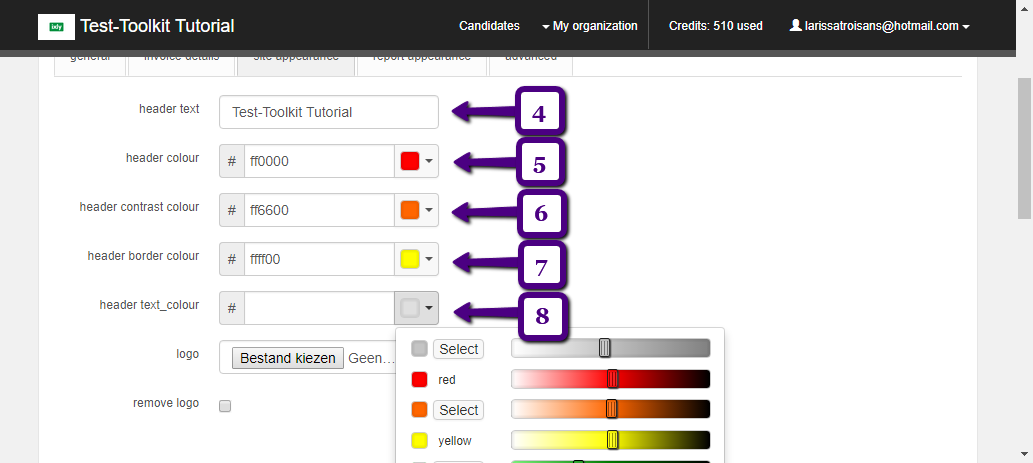
(4) Here, you will have the option of entering a name that will appear in the top left corner. Please note: you cannot have both a name and a logo.
(5) You also have the option of selecting a background colour for the top header. You can enter a colour code or select a colour by clicking the colour box. A drop-down menu will appear, as shown in the image above at (8). Click the colour you wish to use and click “Select’.
(6) This allows you to choose the colour that will appear when a button is clicked in the menu.
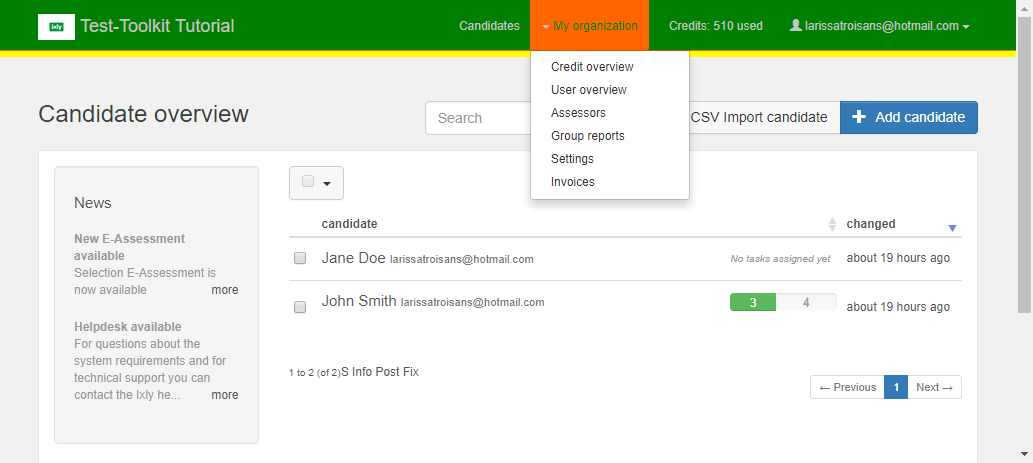
(7) The colour you select here will determine the colour of the line below the green top header.
(8) Finally, you have the option of selecting the colours of the buttons in the menu.
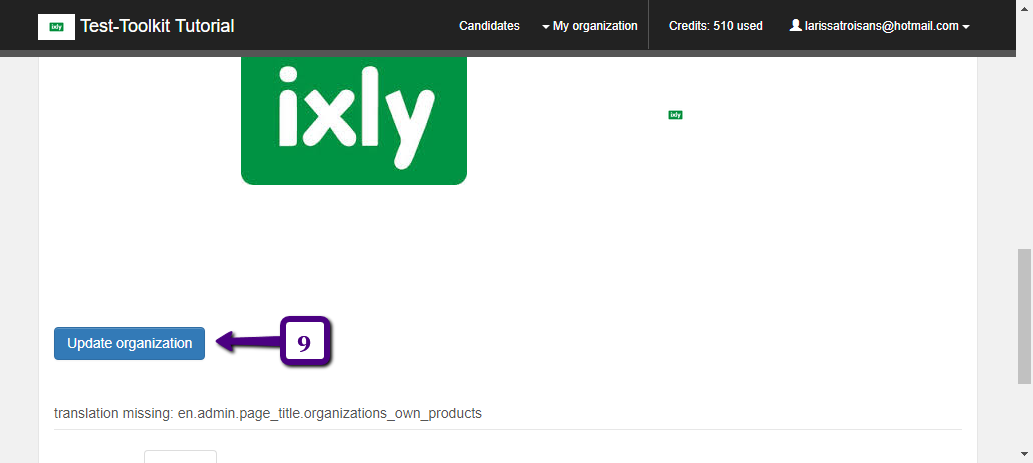
4Next, click ‘Save organisation’.
 5
5The colour selections shown in this example would result in the following site appearance:
-
Comment puis-je personnaliser mes préférences personnelles?
1
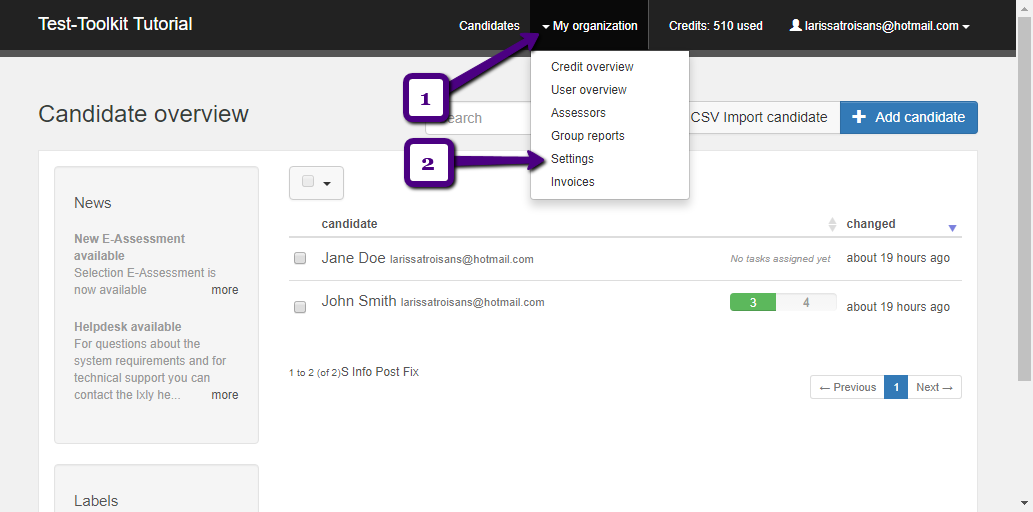
(1) Click ‘My organisation’.
(2) Click ‘Settings’.
 2
2(3) Click the arrow next to ‘Dutch’ to edit the language preference.
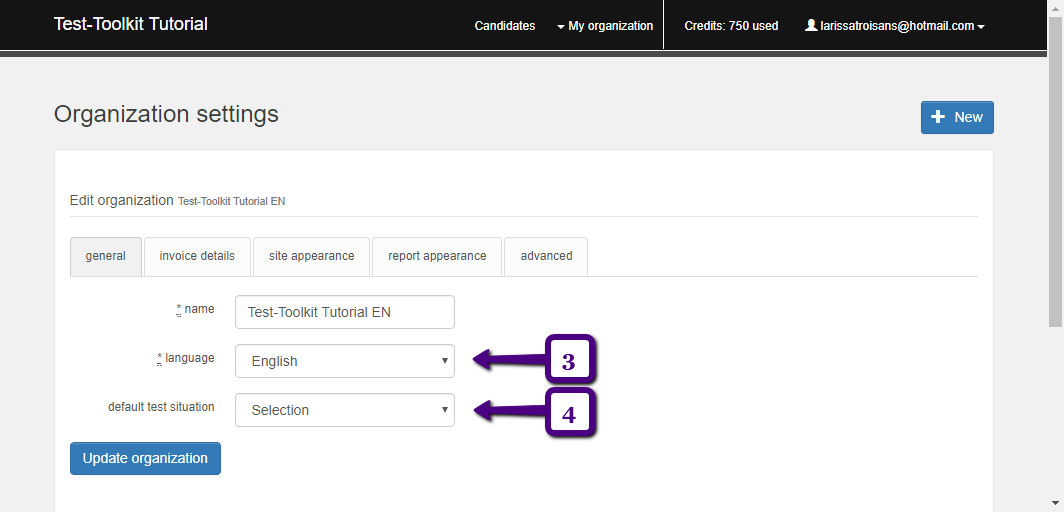
(4) You can select ‘Selection’, ‘Advice’, and ‘Other’ as the standard test situation. Your candidates will the automatically be grouped under that test situation. If any of your candidates should fall under a different category, you can edit their specific test situation in their candidate setting pages.
Finally, click ‘Save organisation’ to save your settings.
-
Comment puis-je mettre à jour mes informations de facturation?
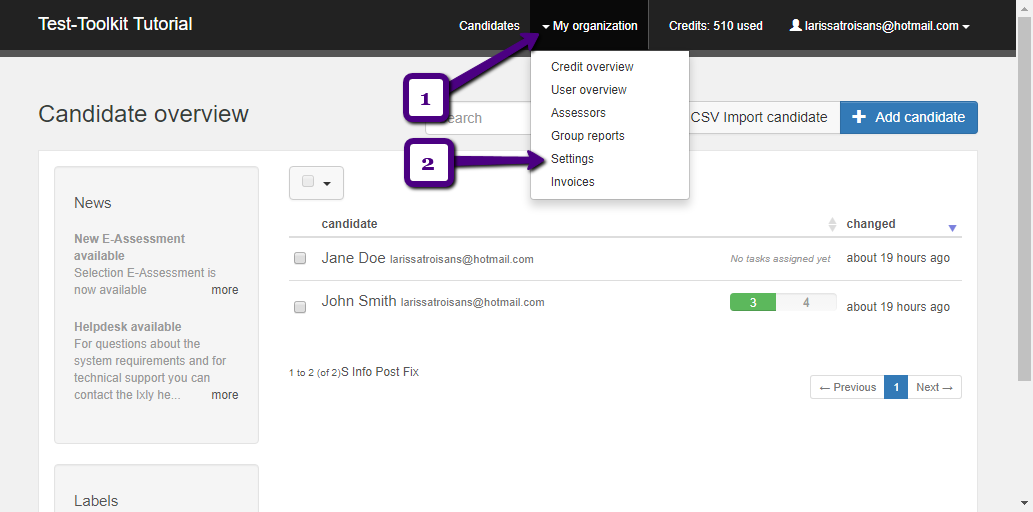
1
(1) Click ‘My organisation’.
(2) Click ‘Settings’.
 2
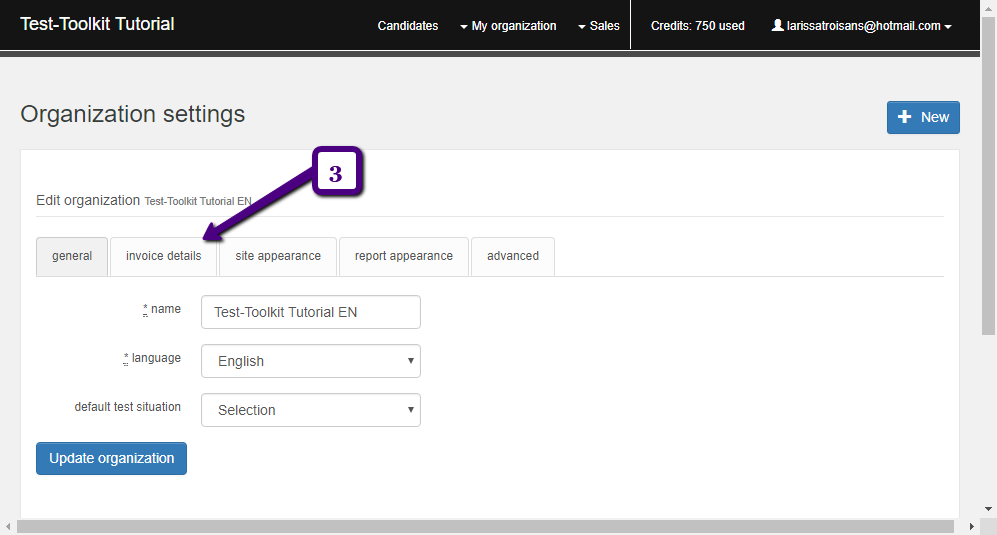
2Click ‘Invoice details’. You will be able to edit the following data: company name, attn., address details, email address that invoices should be sent to, and VAT number. Fill out the data according to your invoicing preferences.
Finally, click ‘Save organisation’ to save the data.
-
Comment puis-je configurer des centres de coûts?
1
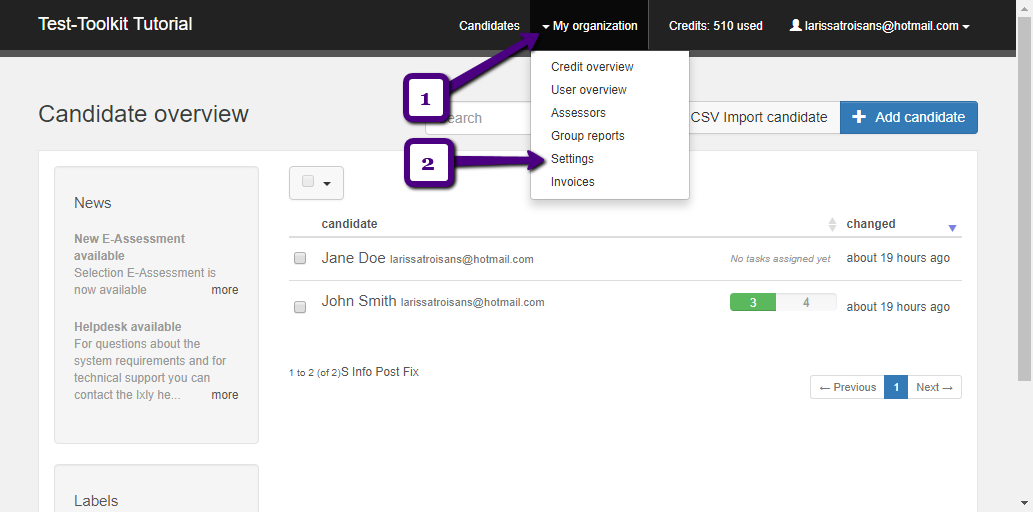
(1) Click ‘My organisation’.
(2) Click ‘Settings’.
 2
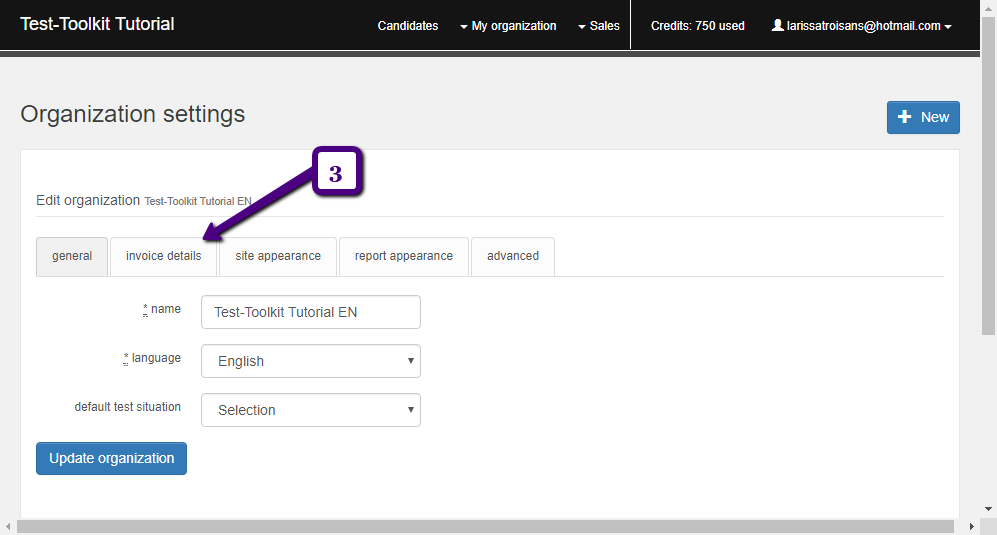
2(3) Click ‘Invoice details.
 3
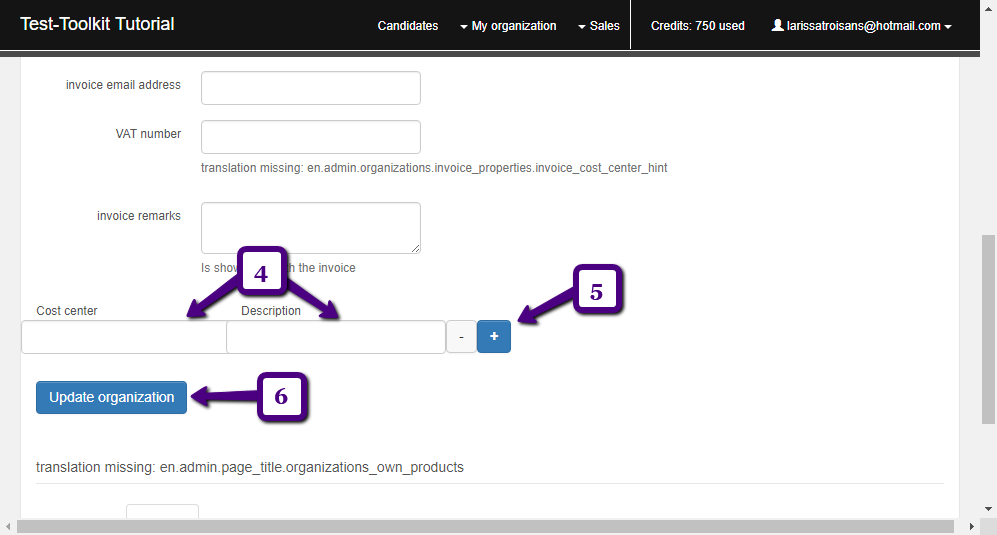
3(4) Specify a cost centre and add a description.
(5) If you want to add more cost centres, click +.
(6) Finally, click ‘Update organization’ to save your settings.
-
Comment puis-je ajouter un utilisateur?
1
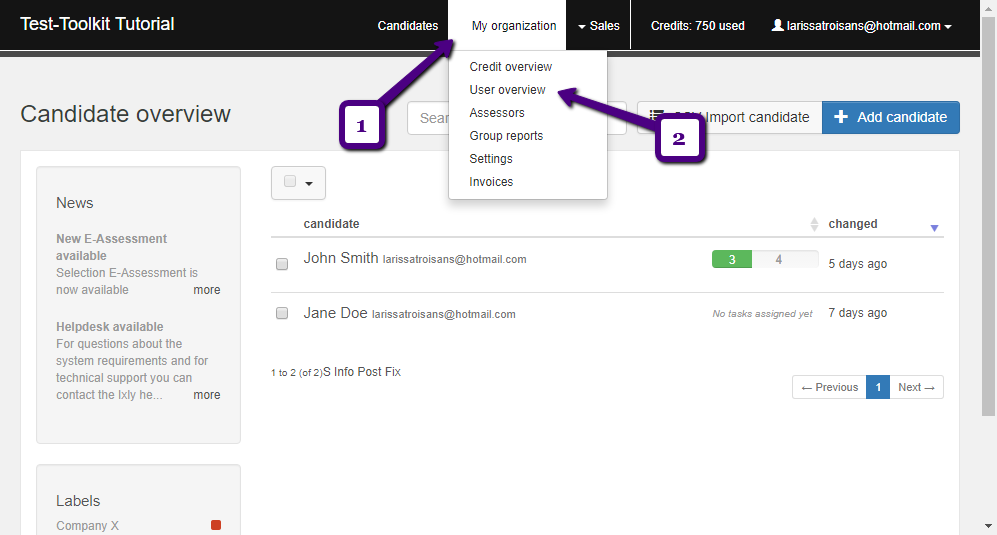
(1) Click ‘My organisation’.
(2) Click ‘User overview’.
 2
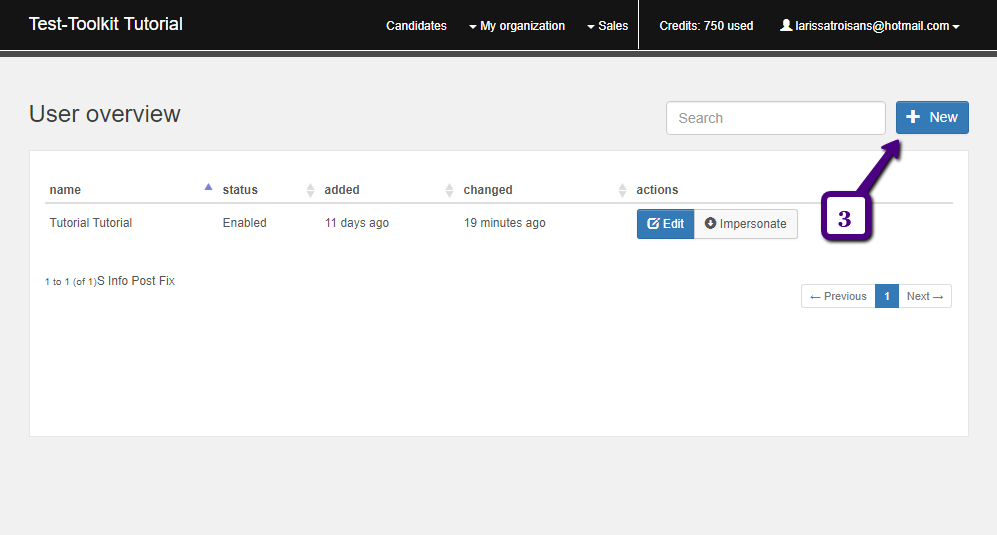
2(3) Click ‘New’.
 3
3The following fields will now appear at the bottom of the page:
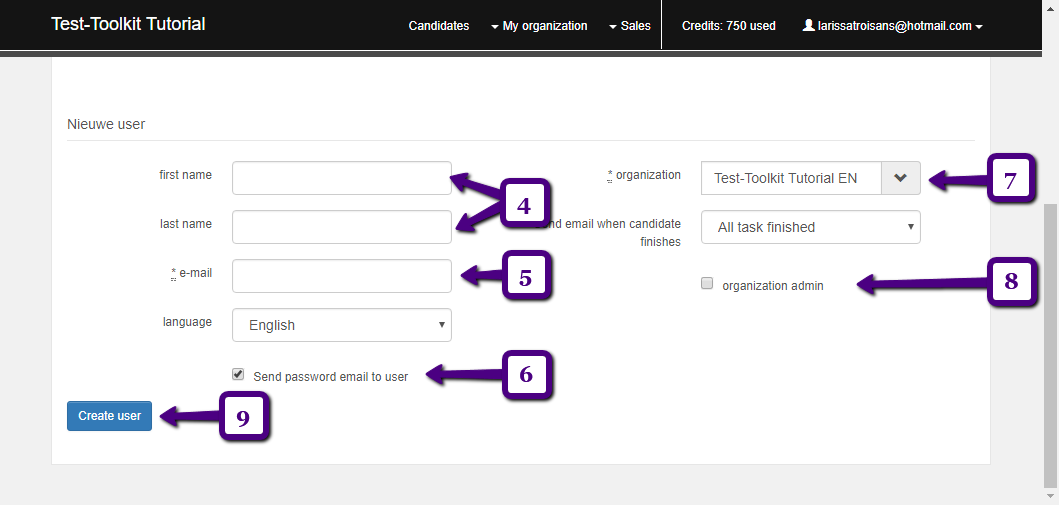
(4) Enter the user’s first name and last name.
(5) The email address you enter here will be the one to which the user’s login details will be sent.
(6) If you do not uncheck this box, an email containing login details will automatically be sent to the new user.
(7) To find the organisation that the user belongs to, enter the first few letters of the organisation’s name. The system will automatically provide the matching organisation names. Please note that users can only be linked to organisations if the ‘sub organisation’ feature has been activated for your account. Activation of this feature is only possible if you have an intensive subscription. For activation, please contact our helpdesk by calling 088-49 59 000 or sending an email to info@ixly.nl.
(8) This box will allow you to indicate whether the new user is an organisation administrator or not. If you check it, indicating that they are an administrator, they will be able to edit organisation settings. If you do not check the box, the new user will not be an administrator and will only be able to add new candidates and assign tasks to them.
-
Comment puis-je ajouter un évaluateur?
1
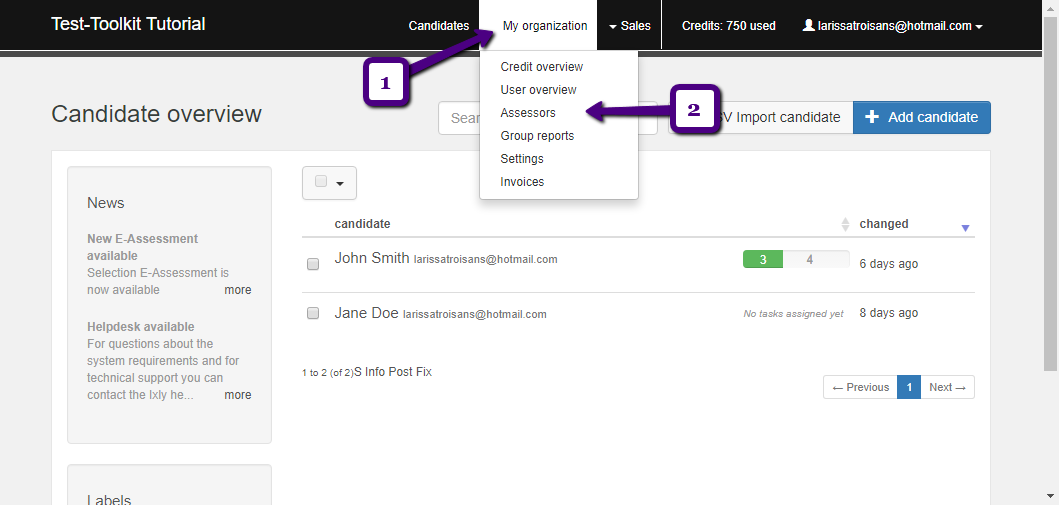
(1) Click ‘My organisation’.
(2) Click ‘Assessors’.
 2
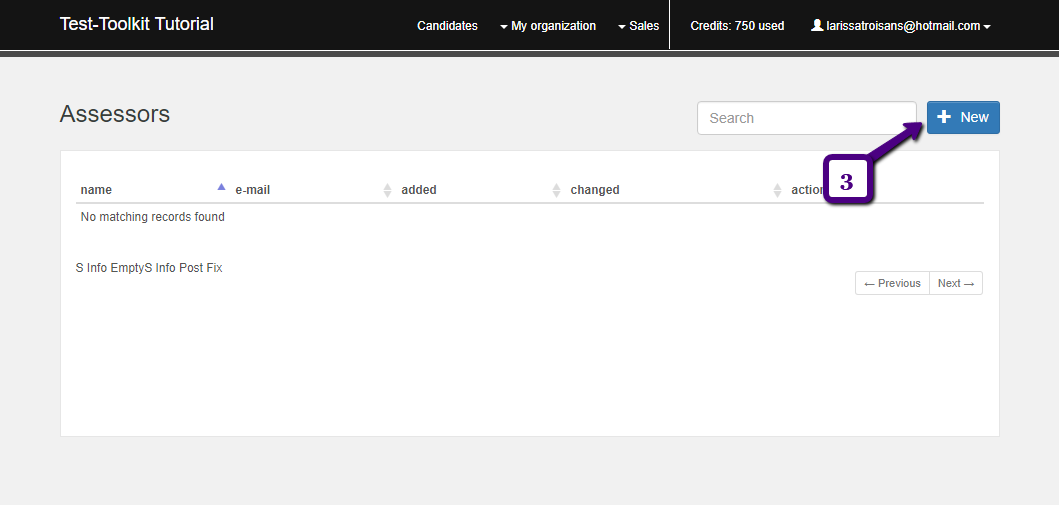
2(3) To create a new assessor, click ‘New’.
 3
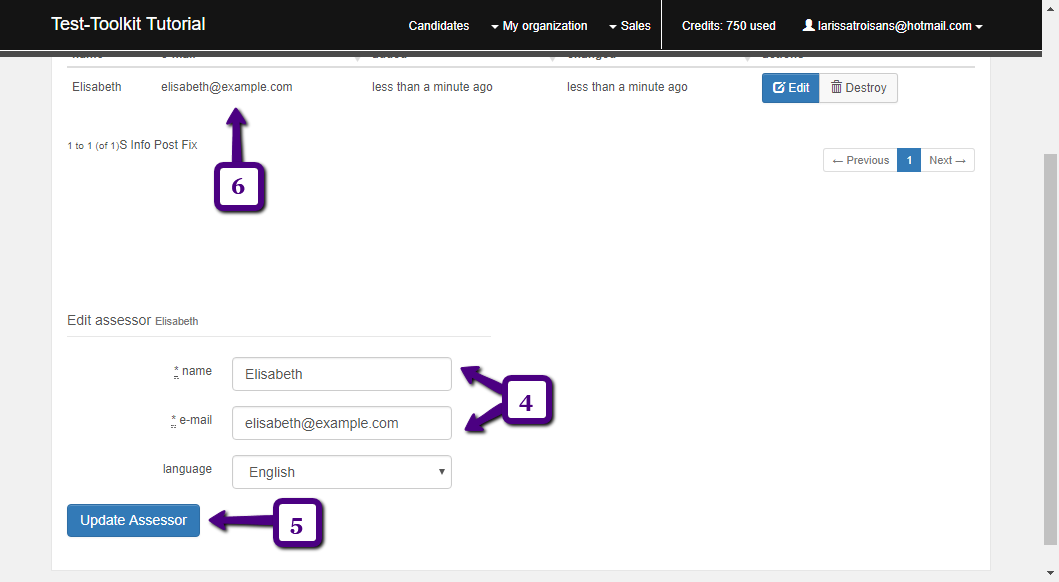
3(4) Enter the name and email address of the assessor you want to add.
(5) Click ‘Save assessor’.
(6) Once the assessor has been saved, they will appear in the list, as shown in the image below.
-
Comment puis-je ajouter en une seule fois un groupe de candidats par l'intermédiaire d'un fichier csv?
1
Making a CSV file
You will make the CSV file as follows in advance:
- You will make a list of candidates in Google spreadsheets or Excel
- The first row (title row) must have the following structure:

- The file must contain a number of mandatory fields; these are:
-
- Language: The candidate’s language, e.g. nlfor Dutch or en for English
- Email: The candidate’s email address
- Name_first: The candidate’s first name
- Name_last: The candidate’s last name
- Moreover, there are a number of optional fields:
- Name_insertion: Last name prefix
- Task_keys: This field is used to indicate which tests and questionnaires need to be made available to the candidate. The list of available task keys can be found under the settings in your account if you have suborganisations. If this is not the case, then you can request the required task keys from us. One or more tests can be made available to the candidate at once. You can do this by placing a “;”between two task_keys (e.g. form_wpv;form_cw;etc.). If the task keys are too much of a challenge for you, you can leave them out and only import the candidates; subsequently, you can assign tasks to all candidates at once in a bulk action.
- Test_situation: The candidate’s test situation. There are three test situations you can enter: advice, selectionor other.
- Cost_center_name: Below, you can indicate under which cost centre the candidate needs to be placed. If you do not use this field, then all candidates will be placed under the default cost centre.
- File – download as / save as – Comma separated values (.csv, current tab)
- Do not do anything else with the downloaded file; leave it as it was saved
2Go to the Test-Toolkit
In the candidate overview, you can click ‘CSV import’.
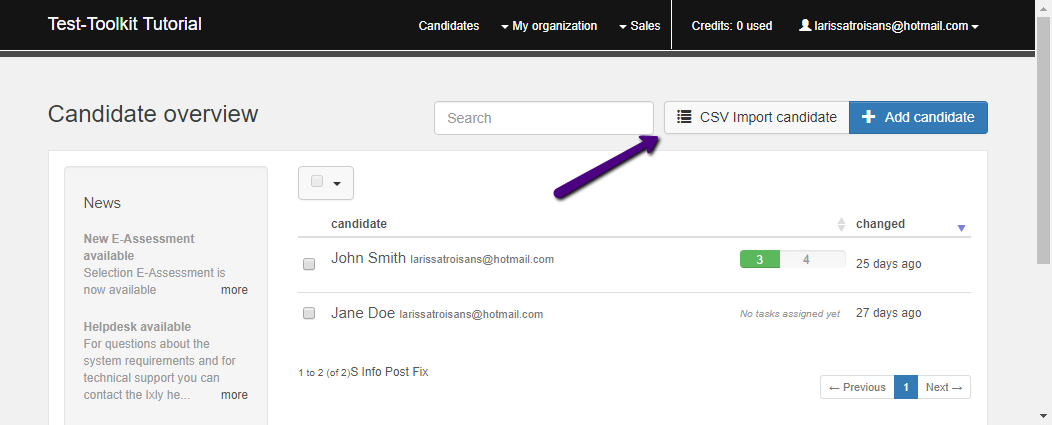
A new screen will open where you can select a CSV file. Here, you can also read which fields are mandatory and optional.
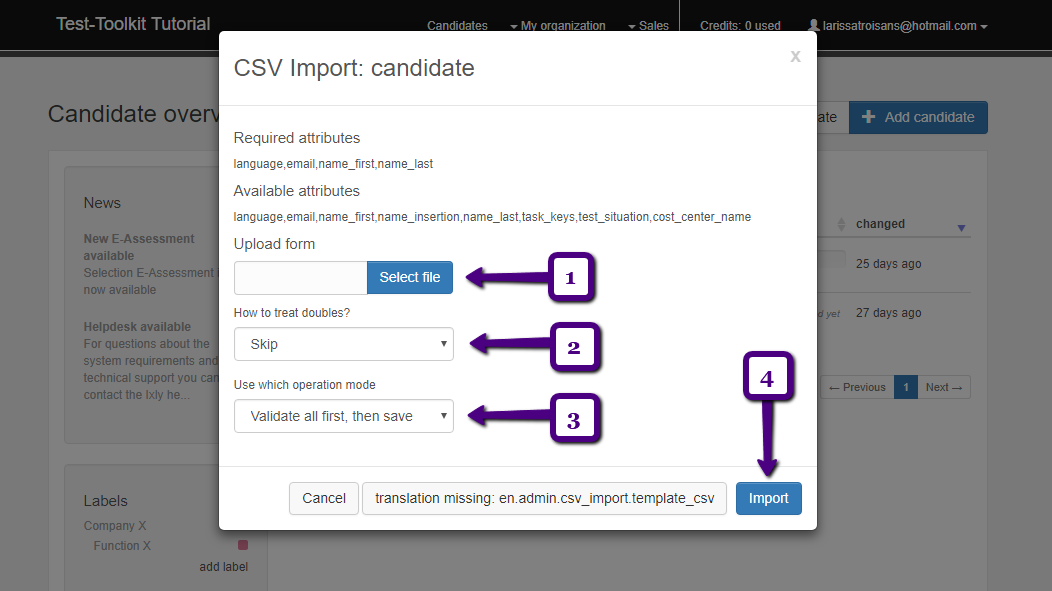
(1) Click ‘Select file’ to upload the CSV file.
(2) Here you can indicate how the system needs to treat identical values.
(3) In this field you can indicate how and if the system needs to save all data of the import.
(4) Now click ‘Import’.
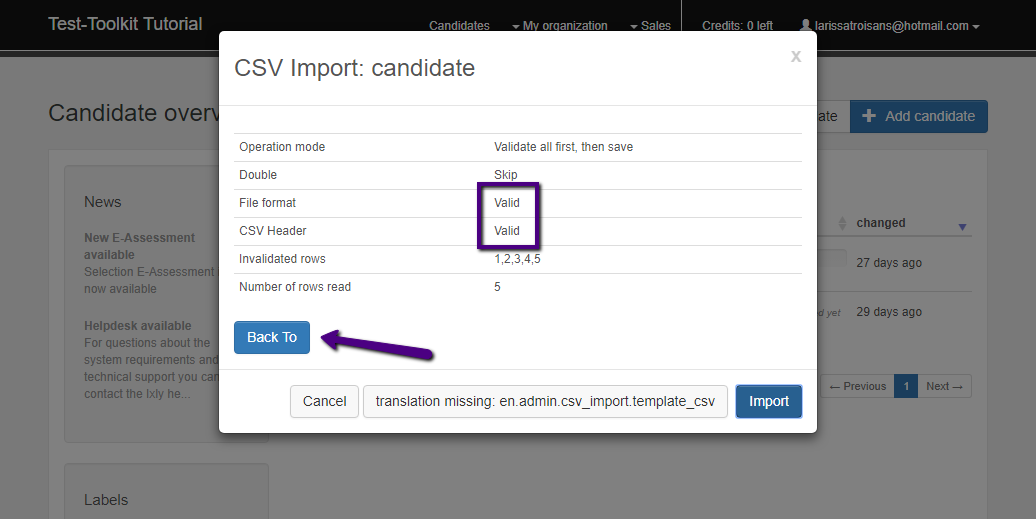
Are the file format and CSV header valid? In this case, you can continue by clicking ‘Back To’ after which a spinner will appear and the candidates will be added. This could take a minute, especially in case of a large amount of candidates. If you cannot continue, then check your file for spelling errors, especially in the first row and also check to see it is saved as .csv.
-
Comment fonctionne la consommation de crédit par abonnement?
1
We have three different subscription types in the Test Toolkit: incidental, frequent and intensive. This is also why the rates of the tests are indicated in credits. For example: using the Thinking Styles questionnaire once will always cost 60 credits. How much is this in Euro? This differs per subscription.
In the incidental subscription, you do not pay a monthly subscription fee. You order bundles of 750 credits or more and receive an invoice for this. You can then use the credits by assigning tests to your candidates. Once the credits have been used, you can order new ones. There is no need to worry, the credits can be used indefinitely. This subscription type is best if you do not use tests that often or if it is difficult to predict how many tests you will need at the start. For the incidental subscription, a credit costs € 0.33.
As soon as you use 307 or more credits a month, then it is more beneficial to use the frequent subscription. For this subscription, you will only pay half the amount for one credit: € 0.17. This means that you also pay half for each test. On the other hand, there is a monthly subscription fee of € 52.50 for the frequent subscription. For this subscription, you do not need to order credits in advance; you will receive an invoice for what you have used at the end of each month.
The monthly invoicing also applies to the intensive subscription. A credit is even cheaper for this subscription: € 0.14. The tipping point lies at 3700 credits a month; from this moment onwards, it is more beneficial to choose the intensive subscription. Customers with this subscription also benefit from other things. For example, they can create multiple users or administrators in the system. For the intensive subscription, the monthly subscription fee is € 170.
Coming back to the example of the Thinking Styles questionnaire of 60 credits per use: For an incidental subscription, the costs are € 19.80. For a frequent subscription, the costs are € 10.20. And for an intensive subscription, the costs are only € 8.40.
The minimum subscription period for all three subscriptions is 12 months. After this period, you can cancel your subscription every month or choose a lower-tier subscription. Do you want to upgrade to a higher-tier subscription? This is always possible!
-
Comment puis-je demander de nouveaux crédits dans un abonnement occasionnel?
1
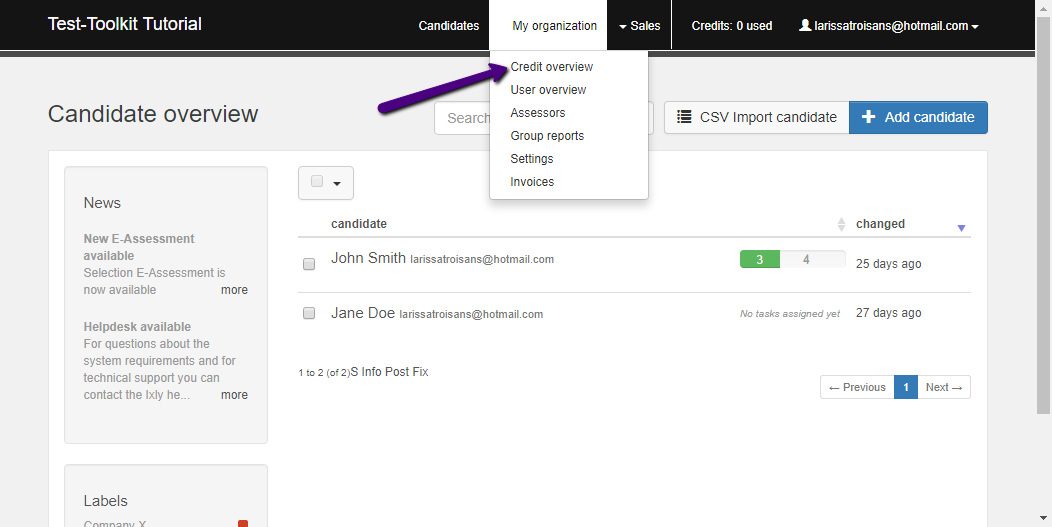
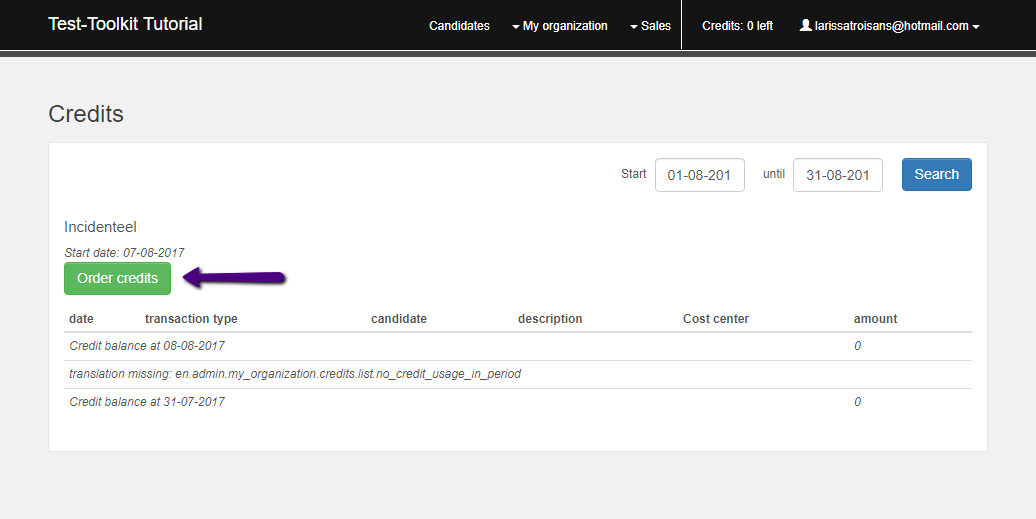
Under ‘My Organisation’, you can find the ‘credit overview’.
 2
2Click the ‘Order credits’ button.
 3
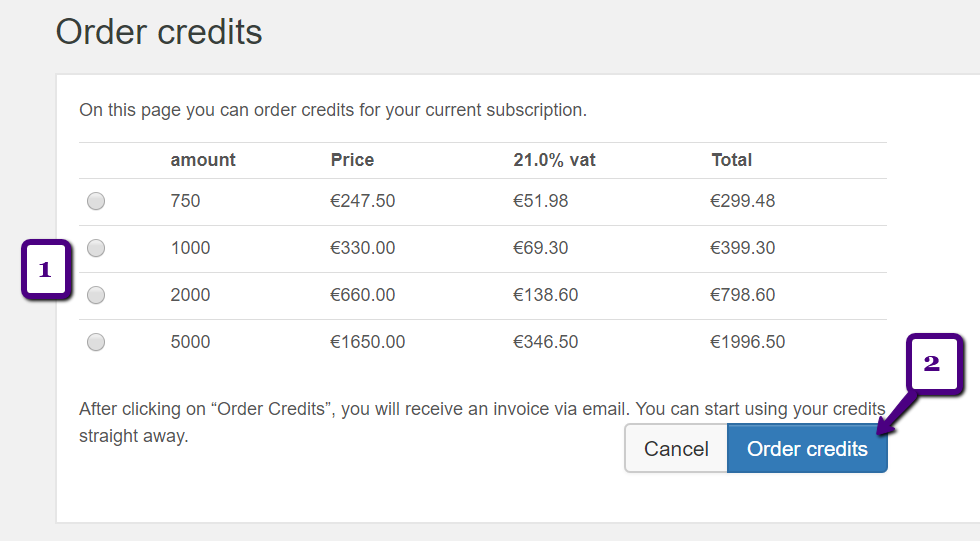
3(1) You can choose between 750, 1000, 2000 and 5000 credits. By the way, VAT costs do not apply for clients outside the Netherlands.
(2) Now, you can click ‘Order credits’ and you will automatically receive an email containing the invoice sent to your invoice email address. The credits will immediately be added to the Test Toolkit so you can get to work instantly!
-
Comment puis-je voir mes factures?
1
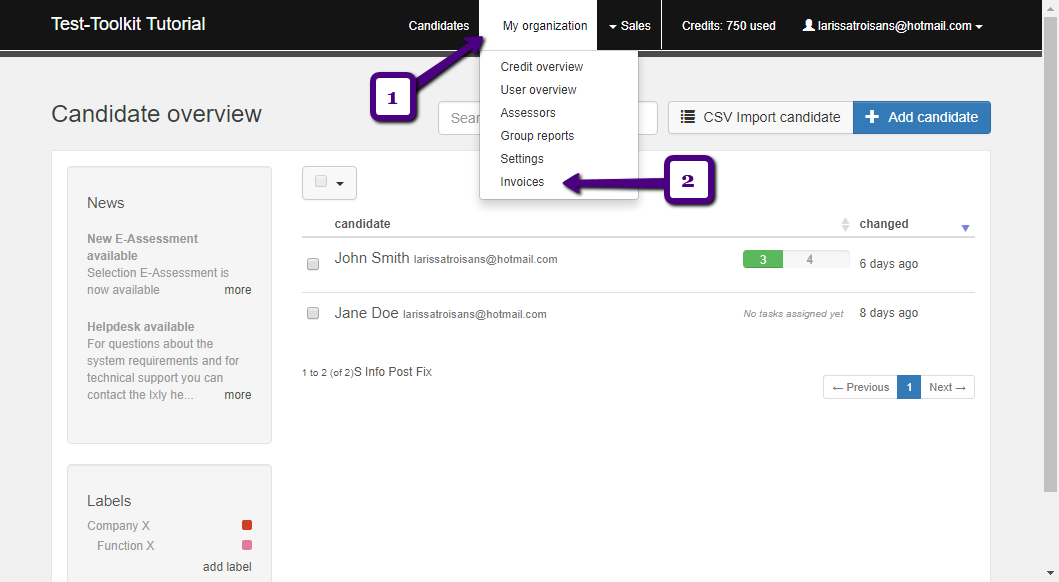
(1) Click ‘My organisation’.
(2) Click ‘Invoices’.
 2
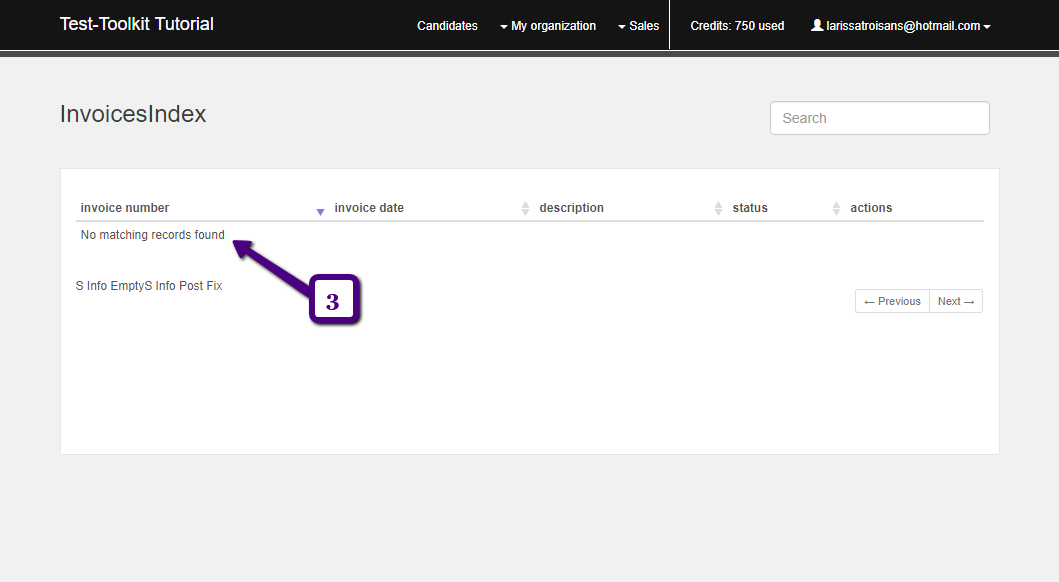
2(3) If you have any invoices, they will be listed here, and you will be able to view them.
-
Comment puis-je demander un rapport de groupe?
1
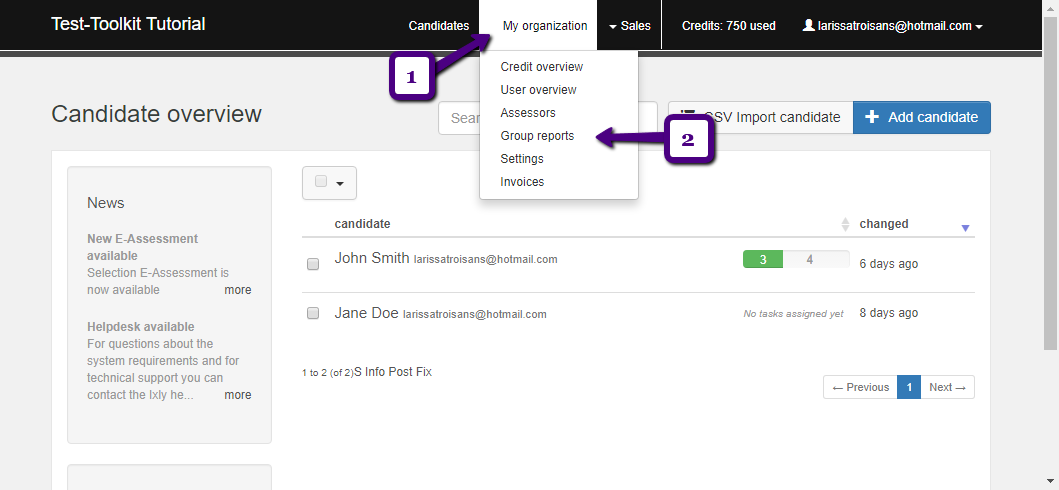
(1) Click ‘My organisation’.
(2) Click ‘Group reports’.
 2
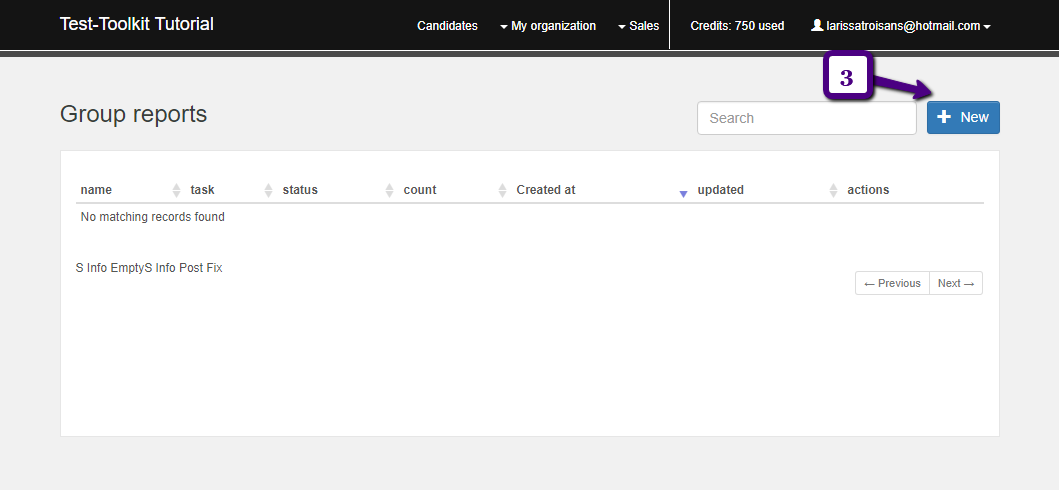
2(3) Click ‘New’.
 3
3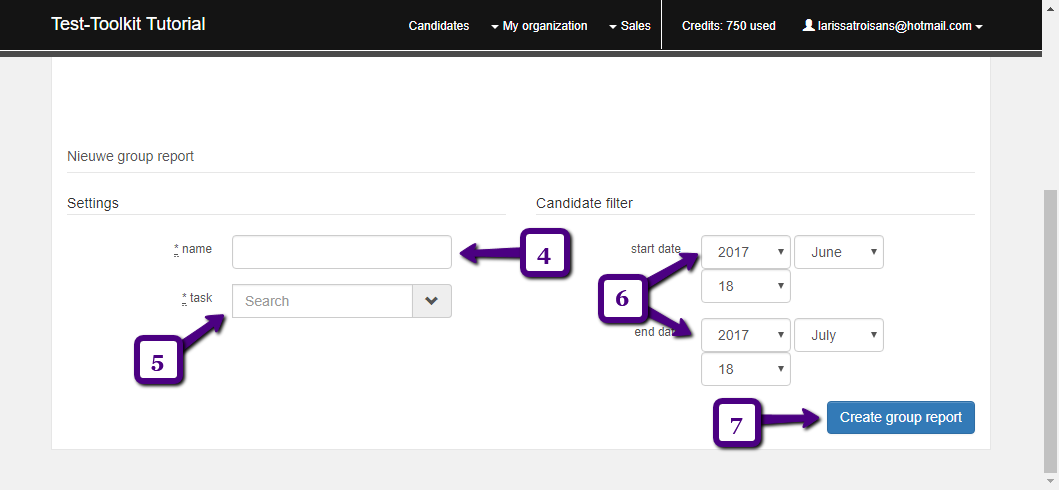
(4) Enter the name of the group report.
(5) Select the task for which you want to request a group report. When you start typing, the names of the various matching tasks will automatically appear.
(6) Next, specify the period in which the candidates must have completed the task.
(7) Click ‘Add group report’ to save the settings.
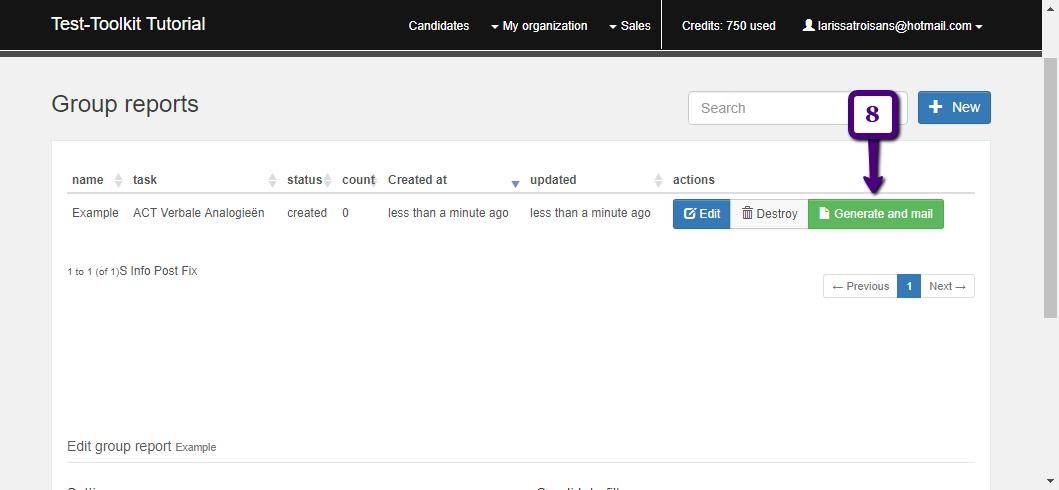
4(8) Click ‘Generate email’.
You will be shown the following alert:
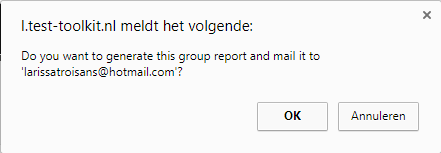
If you accept, the email will be sent, and a CSV file will be sent to your email address.

